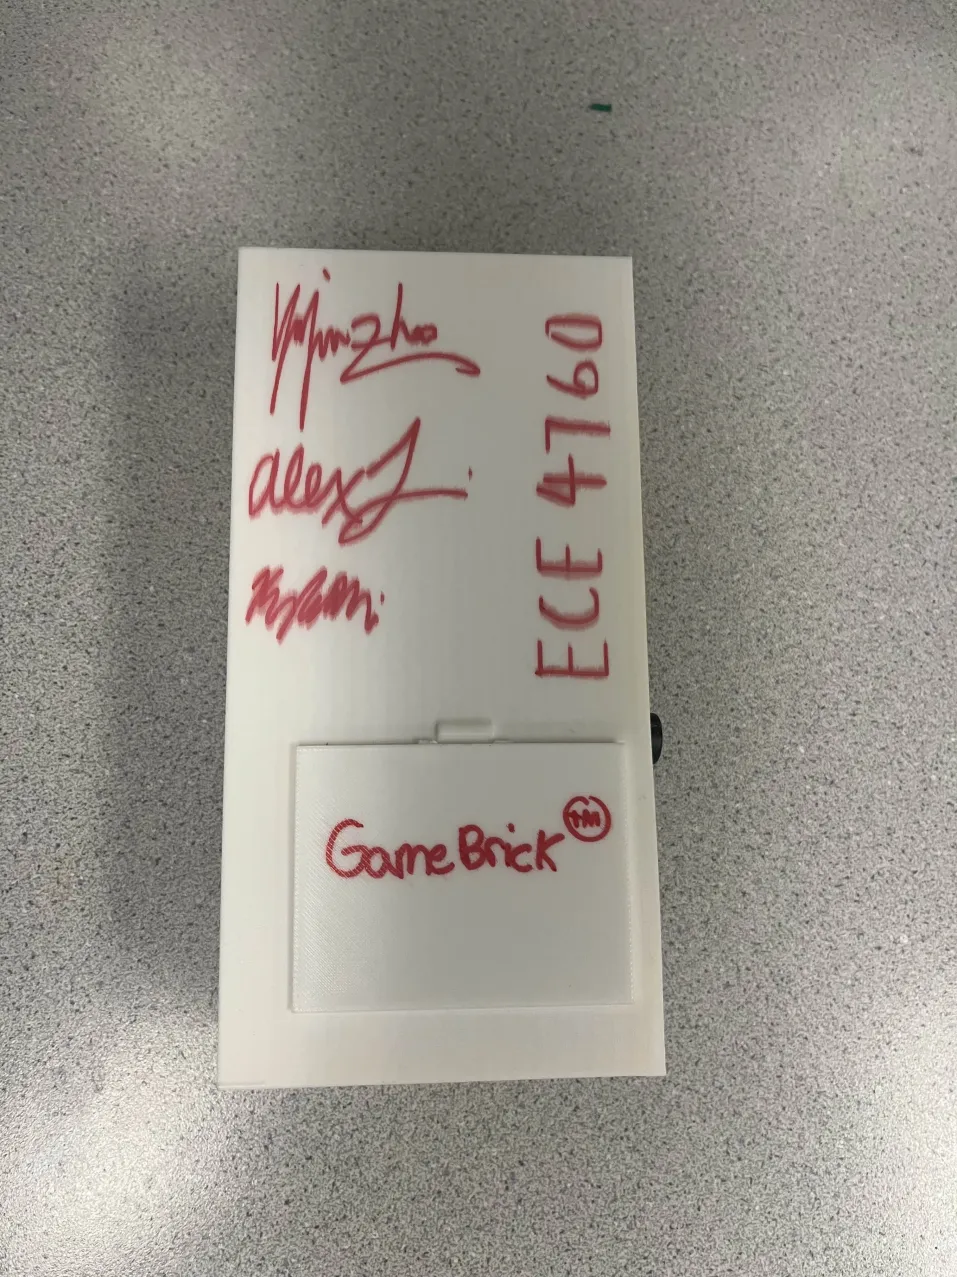
Snake on “GameBrick”
ECE 4760: Final Report
Alex Li (AL2356) | Kyle Mui (KM776) | Yanjun Zhao (YZ2437)
GameBrick- a retro-inspired handheld gaming console modeled after the Game Boy, built to play a custom version of Snake.
Snake is a classic video-game genre in which you steer an ever-lengthening line—usually shown as a snake—while avoiding collisions with walls, obstacles, and, most critically, your own body. The challenge rises as the snake grows, leaving less room to maneuver.
Our final design project for this course was a modern twist on the classic arcade Snake game, implemented in a portable form factor similar to a Game Boy developed by Nintendo. All of us enjoyed playing games growing up and decided to explore project concepts in that domain. We thought a handheld gaming device would be an excellent way not only to dive into our interests but also to understand what goes on underneath the hood of these devices. Our handheld, named the “GameBrick” is the marriage between hardware and software components. On the hardware side, we utilized a vibrant TFT display, Raspberry Pi Pico, and SPI FRAM as the main components. On the software side, we tried to make Snake as close to the original as possible. The game features responsive snake movement, snake growth, fruit consumption mechanics, collision detection, and various difficulty modes. It also keeps track of the score while one is playing as well as the overall high score across power cycles.
We chose the game Snake for its simple yet addictive gameplay, making it an excellent way to showcase embedded systems programming, SPI communication, and real-time game mechanics. Our goal was to create a compact, fun, and educational gaming device, blending hardware and software seamlessly.
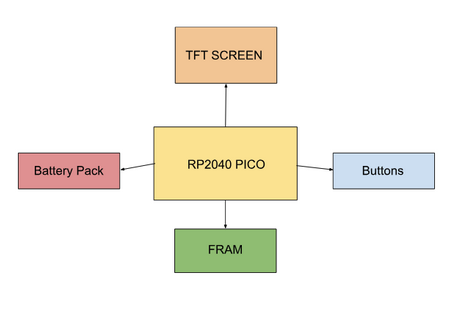
The below figure shows a block diagram of our snake implementation. We are using 4 buttons corresponding to each of the 4 cardinal directions. Our TFT display displays our game in vivid detail while the FRAM module keeps track of the lifetime high score that has been reached. Our program runs on the Raspberry Pi Pico board and everything is powered by an onboard battery pack.
Figure 1: Block Diagram for Major Components
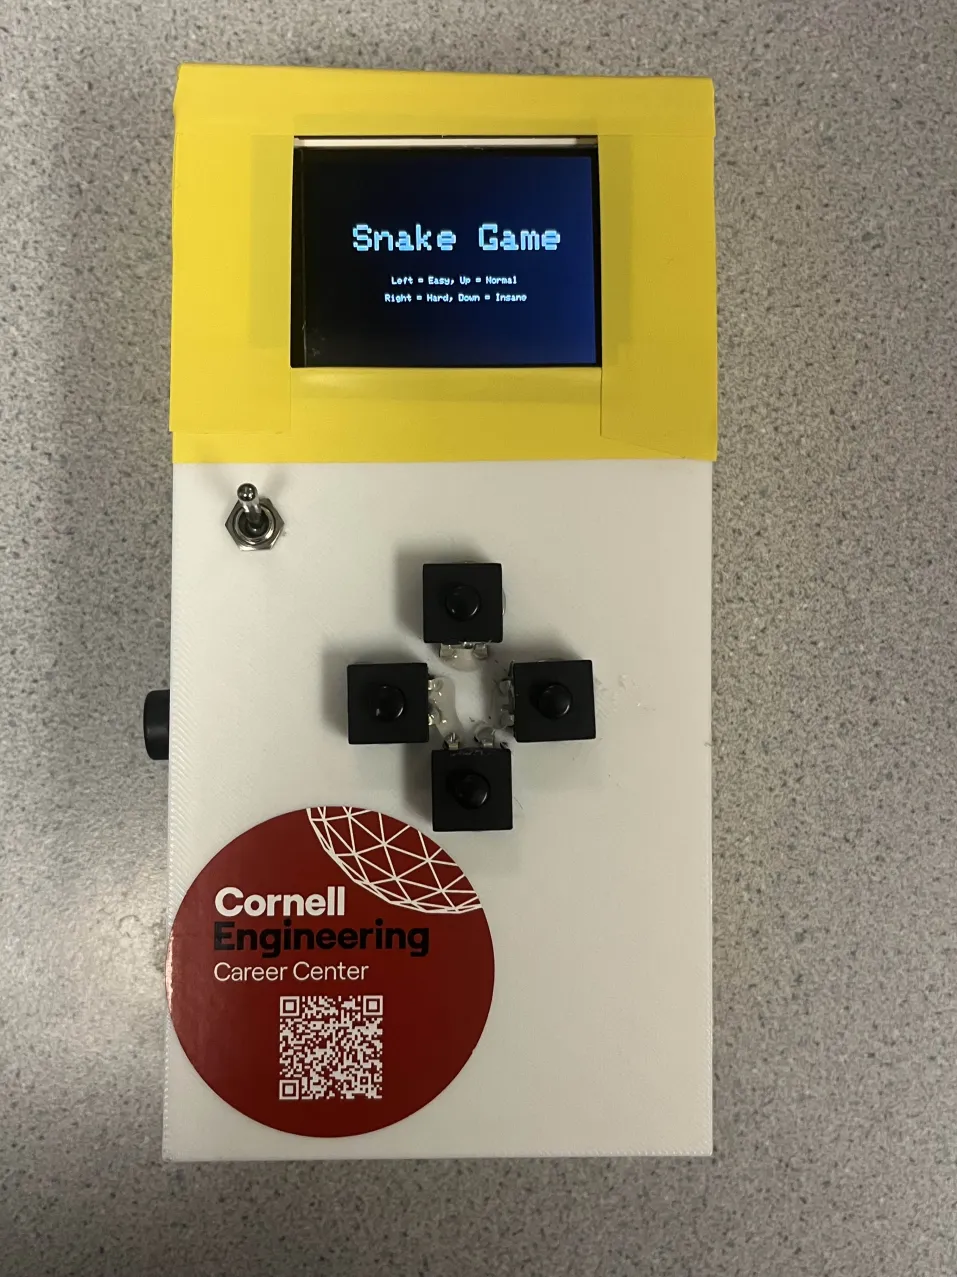
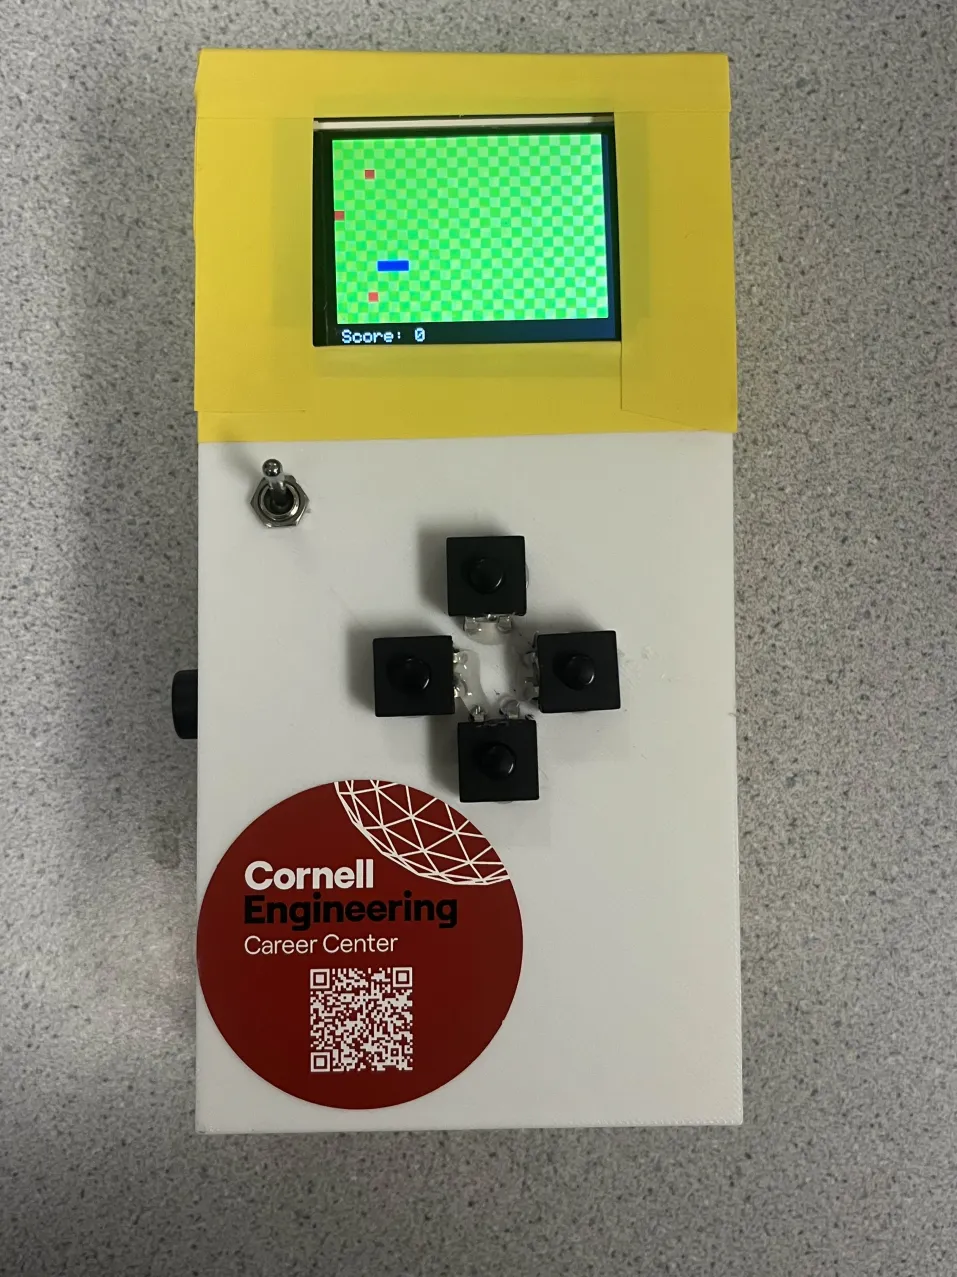
The gameplay loop goes like this: The player first switches on the knob on the GameBrick that is used as a power switch. After a couple seconds, the TFT display will light up and the game will load into a starting screen and start playing menu music. It is here where our display prompts the user to select a game difficulty via the 4 buttons. Each direction corresponds with a different difficulty: Left = Easy, Up = Medium, Right = Hard, Down = Insane. Our difficulty level is managed by cell_size which in turn affects the size of the playable grid. A small cell-size results in a large grid with equally large score requirements for victory. Once a player selects their difficulty level, the game starts and the music shifts into gameplay music. The player starts out with a snake with a length of 3 cell_size. There are several red fruits scattered throughout the map that increase the score and the length of the snake. The game ends when the player has reached the max score possible or when they collide with either themselves or the walls.
Our software is structured clearly into several functional components. The main function initializes hardware, configures GPIO and SPI interfaces, loading resources, and prepares initial game states. The main game logic is handled through dedicated threads using Protothreads; a game-thread manages continuous gameplay, including snake movements, collision detection, and scoring, while a separate screen-thread running on the second core handles state transitions between the start, gameplay, and game-over screens. We use Interrupt Service Routines (ISR) for responsive button inputs, improving gameplay responsiveness and user interaction.
Dynamic audio feedback is provided using PWM to generate sound effects and background music, enhancing the player's experience. High scores are reliably stored in FRAM memory, ensuring they persist even after the device powers off, thanks to efficient SPI-based communication.
When building our system, we carefully considered various hardware and software tradeoffs. We chose a TFT display because it’s portable, easy to integrate with SPI, and responsive, even though VGA could offer a larger display at increased complexity. FRAM was selected over EEPROM or Flash memory due to its rapid access and reliability, despite higher costs and limited storage—ideal for our high-score storage requirements.
In software development, we favored straightforward, reliable algorithms over highly optimized ones. Given our game's relatively modest computational demands, prioritizing simplicity and robustness was deemed more beneficial than pursuing additional performance improvements, which would add unnecessary complexity. Our design has no safety concerns nor do we believe we are in violation of any patents or copyrights.
GameBrick runs two lightweight protothreads—one on the second core for menus and music, and one on the main core for the core gameplay loop—so input handling, rendering, collision checks, fruit spawning, and scoring all proceed smoothly in parallel. Difficulty is chosen at the start by selecting grid size, which automatically adjusts play area dimensions and maximum snake length. Fruits are placed randomly (scaling with snake size), score is drawn at the bottom, and whenever you beat the high score it’s packed into two bytes and saved to FRAM over SPI. Audio—both background tunes and sound effects—uses PWM-driven repeating timers, and all TFT, FRAM, audio, and button GPIO pins were carefully assigned to avoid conflicts. Early issues with button “ghost” presses and broken state transitions were fixed by flag-based interrupt handling and centralizing flow under a single game_state variable.
GAME_STATE | DESCRIPTION |
STATE_START | On boot and after a game-over, the TFT display displays the “Snake Game” menu. The player selects the difficulty during this state. |
STATE_PLAYING | Once the player selects difficulty, the game begins to run. Scores are updated in real time and all game assets are loaded. |
STATE_END | When the snake collides with a wall/itself or if the player manages to gain victory by achieving the max score, the game ends and the player is faced with an end screen displayed on the TFT display (or victory screen if max score achieved). |
Table 1: Description of Game_States
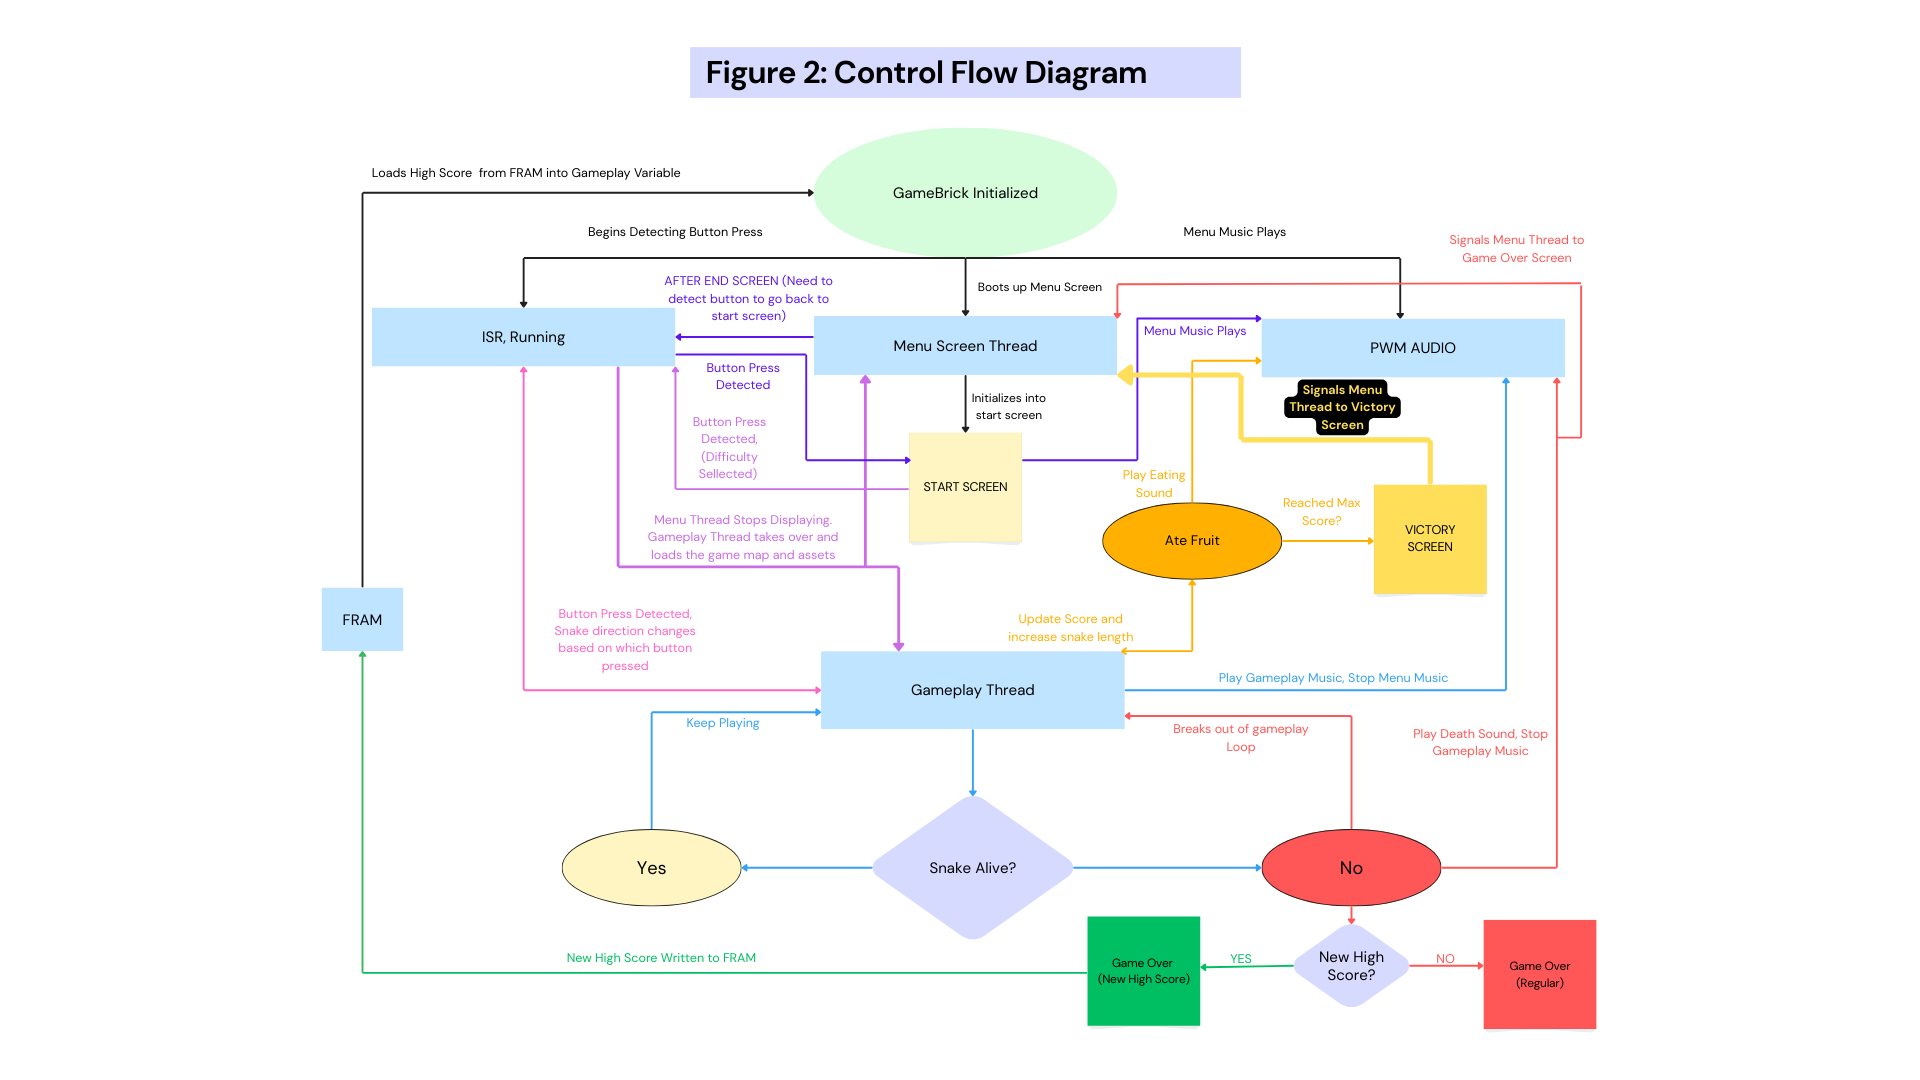
We leverage several external resources: the SPI-FRAM interface and audio routines were generated via AI, the TFTMaster display driver came from Professor Adams’s prior team, and we also incorporate standard Pico SDK and course-provided libraries to handle low-level hardware abstractions. For a more detailed overview of our software, we have created a control-flow diagram for our software processes, and we have our commented source code linked in Appendix B.
Figure 2: Complete control flow diagram. Each arrow color corresponds to a group of processes that happen together
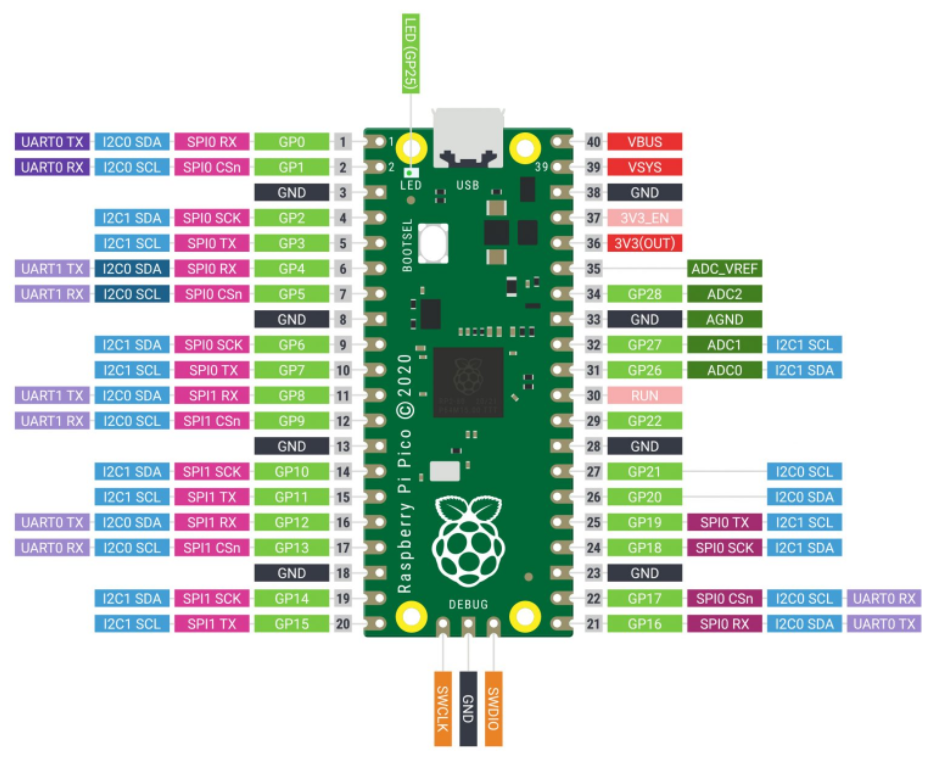
Figure 3: Pico Wiring showing SPI0 and SPI1 channel
All of the components were soldered onto a solderboard to create a compact, durable, and reliable circuit. Using a solderboard helps ensure strong electrical connections that won’t loosen with movement, which is especially important for a handheld game system. It also reduces the chance of wiring errors or loose jumper connections that could occur with a breadboard setup. This approach improves the system’s robustness and makes it easier to integrate everything cleanly into the 3D printed case.
During assembly, wires were cut and measured to be precise fits between components on the solderboard. This helped reduce clutter, prevent accidental shorts, and made the layout much easier to understand and debug. Neatly routed connections enhanced reliability and allowed for quick tracing and testing during development. GPIO pins were used to connect the directional buttons, which were debounced in software to ensure responsive and accurate gameplay. The speaker was also connected to a GPIO pin and driven using PWM to generate simple sound effects.
For communication, the system uses two separate SPI buses to avoid conflicts and improve performance. The TFT display connects via SPI1, while the FRAM uses SPI0 to store high scores persistently. This separation ensures smoother updates to the screen without interfering with memory reads or writes. Power is supplied by a 3-slot AA battery holder, which provides 4.5V to the system through the RP2040’s VSYS pin, allowing the board’s internal regulator to handle voltage management safely.
The TFT screen and Raspberry Pi Pico were not soldered directly to the board. Instead, header pins were soldered on, and the components were inserted into matching female sockets on the solderboard. This modular setup allows for easy removal and replacement of the screen or microcontroller for debugging, upgrades, or reuse in future projects. It combines the stability of a soldered connection with the flexibility of a swappable design.
The 3D-printed case was designed and fabricated after the hardware was fully assembled to ensure an exact fit for all components. Precise rectangular cutouts were made for the TFT screen and battery compartment, allowing them to sit flush against the surface for a clean, secure finish. Additional holes were carefully drilled for the buttons, speaker, and power switch, positioned to be less visually prominent while remaining functional and accessible. The buttons, speaker, and case were mounted securely using hot glue to hold them in place without adding bulk. The power switch was clamped firmly with two hex nuts, keeping it flush with the surface and easy to toggle. These finishing touches helped improve the system’s overall appearance, durability, and usability, giving the final product a polished, professional look.
Overall we were extremely satisfied with the result of the design. Although there isn't much to discuss in terms of test data, scope traces, waveforms, etc, we did notice that once a snake eats a fruit there are many variables to check for resulting in a very slight delay before resuming. For instance, once a snake eats a fruit, we are updating the score, spawning more apples, deleting apples, respawning another somewhere else as well as increasing the size of the snake. Initially we thought this was a big problem but as we continued to think about game design we felt that it was very retro-esque to have this delay.
The RP2040’s low operating voltage and minimal power draw ensured that no components became hot during use, and the full enclosure of the system within a 3D-printed case further protected the user from direct contact with any circuitry, making the GameBrick both safe and comfortable to handle. In our final product only the TFT screen and the speaker are exposed to the user. We also added a power switch to instantly have a way to shut the GameBrick down if anything was happening. Our buttons had some of the wire stems exposed but we covered that up with hot glue. This ensured that the player never actually came in contact with actual metal components. We used hot glue to hold the GameBrick together and then went over it again with electrical tape to cover up any rough spots.
Prior to the demo, we invited many people including friends and the professor to trial run the GameBrick and received a lot of positive feedback. We also played with it ourselves extensively to see if a victory screen could be reached.
Coming into this final project we knew we wanted to do something like the classic Gameboy. Initially we were going to do everything on the VGA display but we decided why not go portable like the actual Gameboy. We weren't sure how much time we would have to put multiple games onto the device so we decided to focus on Snake.
We wanted it to be completely portable. We also knew that we wanted the design to be instantly recognizable as a handheld gaming device like the Gameboy. To support this vision, we powered the system using a 3-slot AA battery pack and integrated a 3-way switch that cleanly connected the power circuit for safe and convenient user control. We added big tactile buttons and sound as originally planned. The power switch was also very intentional.
I think where we could’ve done things maybe a bit different was in terms of product design. We were extremely focused on getting a working project. and didn’t spend as much time on product design. Some things we may do differently next time is to order soft touch higher quality buttons. Although we did place the order they didn’t end up getting here on time. We also feel like we could’ve hid the speaker on the inside of the GameBrick and moved the power button on top of the GameBrick. This way things would look a little more aesthetic.
On the software side, everything basically went as planned. The most challenging part was probably integrating the FRAM. This was a new thing that no one on the team was familiar with but after combing through documentation and datasheets we were able to successfully utilize it.
Our design met the course standards by combining technical depth with creativity and hands-on execution. We wanted to build something fun and meaningful, so we chose to bring the classic Snake game to life in a retro-style handheld system. The project challenged us to blend software and hardware seamlessly—from programming game logic and audio feedback on the Raspberry Pi Pico to wiring up a TFT display and FRAM for visuals and data storage. Each week, we made steady progress, testing features as we built them and making adjustments along the way. We focused on usability and safety by designing intuitive button controls, using low-voltage components, and making sure the game responded smoothly. Saving high scores in FRAM and adding sound effects gave the experience an extra layer of polish. In the end, we created something we’re proud of—a fully functional, playable game system that captures the nostalgic feel we were aiming for and reflects the goals of the final project in a fun and engaging way
The group approves this report for inclusion on the course website.
The group approves the video for inclusion on the course youtube channel.
Alex Li
Yanjun Zhao
Kyle Mui
Find our complete code here: https://github.com/YJ-7274/Snake_ECE.git
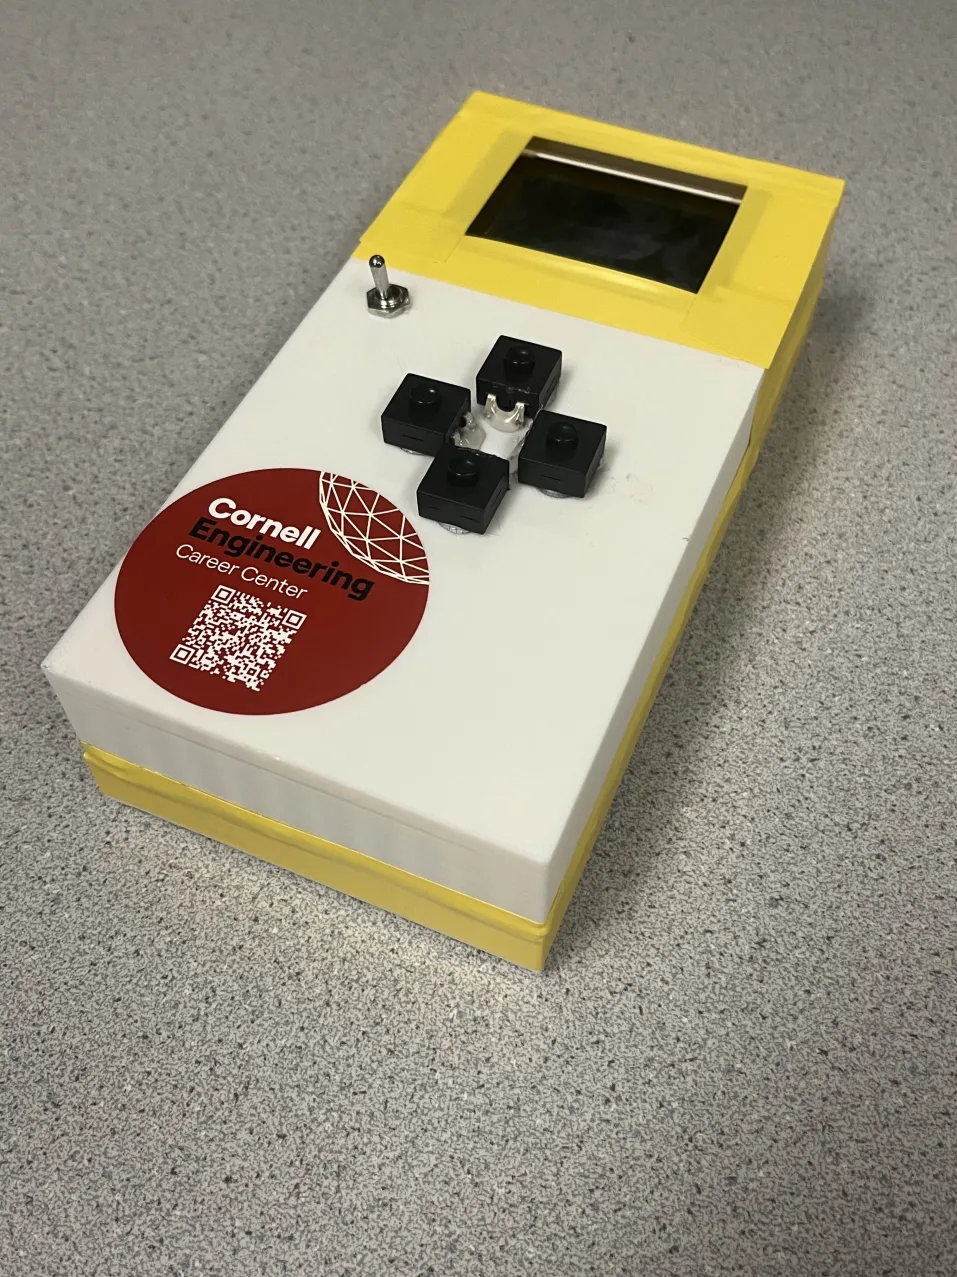
Figure 4: Front face of GrameBrick. The power switch, four buttons and the TFT display is shown.
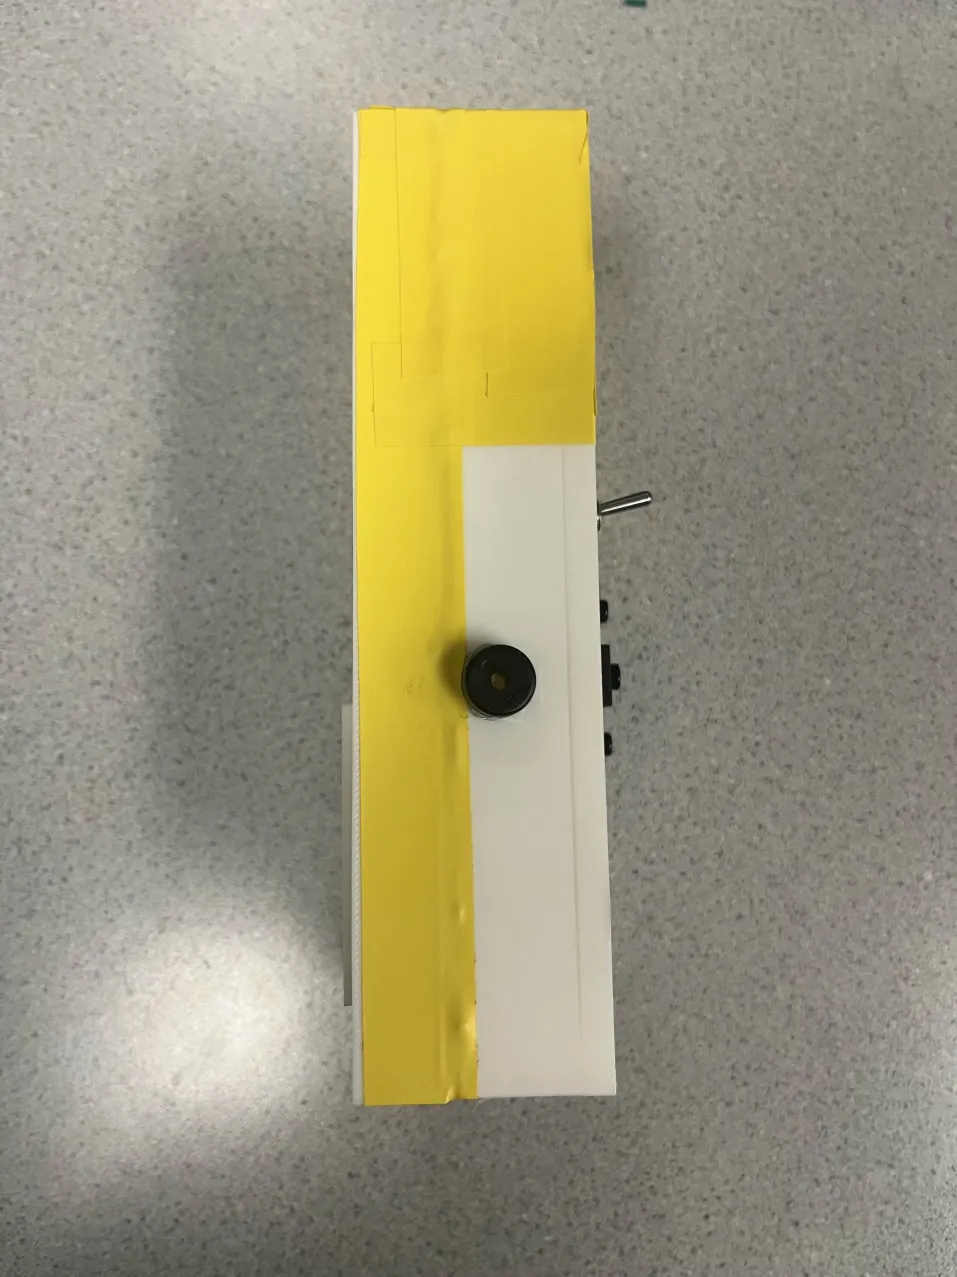
Figure 5: Side profile of the Gamebrick. The speaker is shown.
Figure 6: Bird’s Eye view of the GameBrick is shown in the starting menu.
Figure 7: Bird’s Eye view of the GameBrick is shown in the game.
Figure 8: Bird’s Eye view of the Gamebrick’s back. Battery cover cutout shown.