Program Design
To design this program we first determined how we were going to organize our code.
To this end we organized our code as such, both cores of the RP2040 were used,
and three separate threads were used to further demarcate code purposes.
For file organization any code that was proposed only for the RP-2040 (including the DAC) was written in a single C file.
The code that interfaced with the APDS-9960 was written in a separate C file and was included in the main file.
This separation of files was done so that if the APDS was going to be used in separate scenarios
then the code to access at least the proximity sensor can be easily included.
The structure of the code organization on the RP-2040, multi-core / threading, was done so for this reason.
Since we were using Direct Digital Synthesis (DDS) to generate game sounds we needed realtime control on the interrupt so that the generated sound sounded good.
Since the pico has two cores and only one was being used, to fully achieve this real-time constraint the second core was used.
The rest of the code was organized on the first core of the pico. This code was organized into three threads.
A thread for the buttons, to allow user control, a thread for serial inputs to allow easier debugging and if the buttons fail to allow the user to still play the game, and the last thread, the game loop.
This last thread is where the majority of the code implementation happened. Lastly, all of the functions that were defined and used throughout the game loop were defined above the game loop thread, and any other functions were defined below this loop.
The loop was then further organized so that proper behavior was seen while playing the game.
The game checks if paused, if paused then the body of the game loop does not execute, instead it goes to the pause (or death) screen.
Next from top down the thread checks if a user bullet has been fired, then it does enemy movement, then the firing of the enemies’ bullets.
The thread then moves all of the bullets that are on the screen, then after all the bullets have moved it checks a bullet hit on either the user or the enemies,
then the game moves the user according to the proximity sensor. After all of this does the game then check if the user has won. The loop then restarts from the top.
One more code organization that we implemented was to create another set of structs, one for big and one for small, so that we could store in a struct array all of our enemy objects and bullet objects.
Thus we had two structs to hold both big and small enemy objects and another 3 arrays to hold big and small bullet objects, 2 for the enemy bullets and 1 for the user’s bullets
Sprite implementation
In this version of Space Invaders, we created sprites for big enemies, big enemy bullets, small enemies, small enemy bullets, a user ship, and user ship bullets.
Each sprite object was created by a struct which contained the information as to whether the sprite should be drawn, if it had been shot (in the case of bullet sprites), the x,y positions of all four corners and the bitmap array that contained all the pixel information. So the variables in the sprite object are:
| object_array | Holds the Pixel Map. |
| top_left | Holds the top left coordinate of the Sprite. |
| top_right | Holds the top right coordinate of the Sprite. |
| bot_left | Holds the bottom left coordinate of the Sprite. |
| bot_right | Holds the bottom right coordinate of the Sprite. |
| draw | Says whether the sprite is drawn. |
| x | Length of the Sprite's x dimension. |
| y | Length of the Sprite's y dimension. |
| shot | Says whether the sprite is shot (if a bullet). |
Since no dynamic memory allocation occurs in this program, two versions of this struct were created, one struct for the “small” sprites, in which their bitmap was an 11x11 array, and another “big” struct for objects whose sprite was 18x18 pixels. Because of these two separate structs, every function that can possibly take in both big and small has two versions, one for the small version and one for the large version.
Each sprite visualization is represented by a bitmap. A bitmap is a 2D-array of numbers that specify the color of each pixel in the sprite. For example, the bitmap shown below would correspond to a 3 by 3 square with a white center.
                    int bitmap[3][3] = {
                        {1, 1, 1},
                        {1, 0, 1},
                        {1, 1, 1}
                        };
Our game has two types of sprites, small sprites and large sprites.
The colors corresponding to each number in our game are shown below:
| Number | Color | Number | Color |
| 0 | Black | 1 | White |
| 2 | Blue | 3 | Red |
| 4 | Magenta | 5 | Green |
| 6 | Cyan | 7 | Yellow |
To display each sprite onto the VGA display, we use a function that loops through each element in the sprite's bitmap which then draws the specific pixel to the screen.
void drawObject(object_reg * t){
    char color;
    for(int i = 0; ix; i++ ){
        for(int k = 0; ky; k++){
            if(t->draw==1){
                switch(t->object_array[i][k]){
                    case 1: color = WHITE; break;
                    case 2: color = BLUE; break;
                    case 3: color = RED; break;
                    case 4: color = MAGENTA; break;
                    case 5: color = GREEN; break;
                    case 6: color = CYAN; break;
                    case 7: color = YELLOW; break;
                    default: color = BLACK; break;
                }
                drawPixel(k+ t->bot_left[0],i+ t->bot_left[1],color);
            }
        }
    }
}
To then clear in object from the screen we would call a similar function, but
instead of setting to a specific color, all pixels would be set to black.
Bullet Movement & Shooting
Shooting the bullet, like moving the ship, is one of the main key gameplay features that we have implemented in this game. To shoot the bullet all one has to do is push the associated button on the breadboard and the user ship will shoot a bullet.
To actually implement this shooting, we first limited how many bullets can be shot at a singular time, this ensures that the player has a chance to not get hit and the player can not fill the entire screen with user bullets. In this case we decided on five bullets total for all objects. This means that the user cannot have more than five bullets on the screen at once and there cannot be more than five big or small bullets on the screen at once as well. To keep track of this number we created ammo counters.
With these ammo counters the shoot functions are only allowed to execute when the respective ammo count is less than 5. Thus when a bullet is shot, the shoot function takes in the sprite that is doing the shooting and the array that holds the bullets. The function then loops through the array until it finds a bullet which has draw == 0 and shot == 0. At this point the function spawns the bullet at the object which shot it and the draw and shot flags are set to 1. At this point the ammo count is incremented as well. Thus when 5 bullets have been shot the ammo count == 5 and the shot function can no longer be accessed.
Then when a bullet is cleared, either by hitting an enemy or by going out of bounds the ammo count is decremented and this allows for another bullet to be fired.
To implement bullet movement. We made a function that takes in the bullet arrays and a direction. The function then loops through until it finds a bullet that has been shot, i.e. shot and draw == 1. When this happens, depending on the inputted direction. The corner coordinates are either added to or subtracted from. This then moves the bullet up or down the screen.
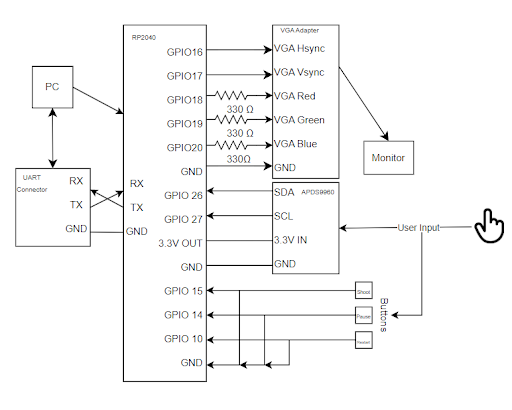
Player Control
To implement player control we decided that it would be interesting and fun to control the player ship through a motion sensor. To this end we used the ADPS-9960 and its IR proximity sensor to provide this functionality. To access the ADPS-9960 we attached it to the second I2C channel on the raspberry pi and set the required register bits according to the ADPS-9960 datasheet. We then read the proximity register from the sensor into a single unsigned byte data array as the size of the output register is only 8 bits.
The example code below is how we were able to read from the ADPS-9960:
int adaFruitRead_pos(){
    uint8_t buffer[1];
    uint8_t position_val = 0x9C;
    i2c_write_blocking(I2C_CHAN, ADDRESS, &position_val, 1, true);
    i2c_read_blocking(I2C_CHAN, ADDRESS, buffer, 1, false);

    return buffer[0];
}
Now that we are able to read from the proximity sensor we are able to properly tell how the player can move. When the proximity value is larger that means the player’s finger is closer to the sensor and thus the user ship should be further right on the screen with the max value of 255 corresponding to the rightmost boundary. In the inverse a sensor value closer to 0 means that the player’s finger is further from the sensor and thus the player’s ship should be more to the left. With the minimum sensor value being the leftmost boundary of the playing area.
The playable area however, is not 255 pixels wide, so to overcome this issue so that the player is able to seemingly reach every pixel in the arena, this 8 bit pixel value was scaled by 2.2 so that it could traverse the entire area. Then to finally move the ship we modified the x coordinate values of the user’s ship to these new scaled numbers.
While this implementation works in moving the user ship, it has the downsides of being very jittery with any variation in the input teleporting the ship around the screen. Thus to allow more stable movement and to allow the user to keep the ship from moving when their finger is otherwise still, we low passed the proximity data so that any noise being added to the movement would be filtered out. We accomplished this by doing adding a new lowpass variable and doing this:
lowPassPosistion = 0.9*lowPassPosistion + 0.1*position
This has the effect of allowing big movements to pass through, such as moving from side to side, but preventing high fluctuations, such as fingers trying to be held still. An interesting side effect from this implementation is that it seemed to give a little bit of “momentum” to the ship as the variable would wind up and wind down. So it would appear to move faster to some final rate and then would appear to slow down to some final position.
Enemy Behavior
Enemy movement is simple. Every couple of cycles, all enemies will move either left or right. After moving left or right for a predetermined amount of cycles, the enemies will stop and begin moving in the other direction. The enemy movement does not depend on how many enemies are still alive.
Enemy shooting happens at random intervals. If a randomly generated variable is within a certain range, then the program will choose a random surviving enemy to shoot a bullet at the user. This means that if there are few enemies remaining, each individual enemy's rate of fire increases. The final enemy can be considered a final boss because it will have an extremely fast rate of fire, making it difficult for the user to align themselves with the enemy to destroy it.
Collision Detection
Collision detection was one of the trickiest features to implement. Our original implementation involved checking every pixel of every object for collisions. This version of collision detection was extremely slow and caused enormous lag. Our second version of collision detection would check if the corners of our models were inside other models, which achieved the same result as the first version, but was faster and more efficient. Shown below is the collision detection between a user bullet and a small enemy.
if(bullets->objects[i].shot == 1 && bullets->objects[i].draw == 1){
    for(int k = 0; kobjects[i].bot_left[1] <= small_enemy->objects[k].top_left[1] && bullets->objects[i].top_left[1] <= small_enemy->objects[k].bot_left[1])
                    && ((bullets->objects[i].bot_left[0] >= small_enemy->objects[k].bot_left[0] &&
                        bullets->objects[i].bot_left[0] <= small_enemy->objects[k].bot_right[0]) || (
                        bullets->objects[i].bot_right[0] >= small_enemy->objects[k].bot_left[0] &&
                        bullets->objects[i].bot_right[0] <= small_enemy->objects[k].bot_right[0]))
                        && small_enemy->objects[k].draw == 1
                    ){
                // Recognize that a collision has occurred
                    }
When a user bullet collides with an enemy, the program stops the user bullet and the enemy is cleared, the user gains a bullet, and a hit sound plays. If a user bullet collides with the top of the screen or an enemy bullet collides with the bottom of the screen, the bullet is cleared.
Sound Effects
To create sound effects, we reused some code from Lab 1: DDS. We made the sounds unique by changing the sound functions in the accumulator. We matched the sound with the event by setting the sound effect variable to either True or False. If true, the sound would play and then set the variable to false in the next cycle.
Changing Game State
Another key feature of this game is the ability to change game state. In this game four different game states were implemented. The normal play state, the paused state, and the dead state and the game end state.
The main state is the play, the game plays as normal. The enemies and player can move and shoot and potentially get hit by bullets causing either the enemy to die and the player’s score to increase or for the player to get hit and lose a life. This state persists until either the player pauses the game, wins the game, loses a life, or completely loses the game.
The second state that is crucial to the game is the paused state. In this state the main game loop / thread does not execute and thus all of the sprites stay still in place. No bullets can be fired and no sprite can die. To switch between this state and the play state a button on the breadboard is pressed. Allowing the user to seamlessly transition between paused and play.
The third state is the death state. In this state the player has been hit by an enemy bullet and has the life counter decremented. The game gets paused and all of the bullets get cleared and the user reset to its initial coordinates. From this state the user can unpause the game to continue playing.
The next state is the lost state. In this state the player has lost all of his lives and thus the game is over. In this state the game is paused, but unlike the previous states the user cannot unpause the game to continue playing. The user is only allowed to press the restart button to begin the game anew.
Another way that was implemented to change game state is the restart button. This button allows the user to switch from any current state to the beginning of a new game. It does this by clearing everything on the screen, resetting ammo back to full, health to full, and the score to zero. When the unpause button is pressed the game starts from the beginning.