Etch-A-Sketch
ECE5730 Final Project
A Project By Spencer Davis (sd954), Ming He (hh759), Joash Shankar (jcs556)
Demonstration Video
Introduction
We have created an experience similar to the Etch-A-Sketch toy using the Raspberry Pi Pico as the host. This final project uses various aspects and peripherals introduced in all three laboratory assignments. From the first lab, we used our knowledge of (direct digital synthesis) for sound generation, (button debouncing) for user input on a keypad, and (fixed point arithmetic) for fast computation of floating point numbers. From the second lab, we have pulled knowledge of the (VGA driver) to allow the user to see what they are drawing on a screen. We have integrated the (IMU) into our design from the final lab to allow for the shake-and-erase feature of a typical Etch-A-Sketch.
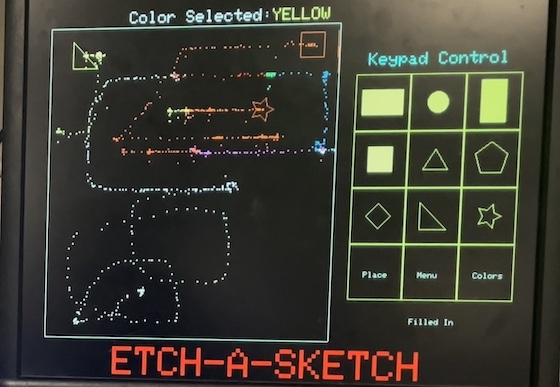
Our Etch-A-Sketch “game” offers the user an extended suite of tools previously unavailable to someone using an Etch-A-Sketch toy. We have added the ability to place filled or outlined pre-drawn shapes to aid artistic ingenuity. The user can also change the cursor's color, allowing up to 10 different hues.
This project utilizes a few peripherals offered by the RP2040, such as the PIO state machines and DMA, to name a few. These Co-processors free up the main processor’s time, allowing it to compute more difficult tasks in parallel.
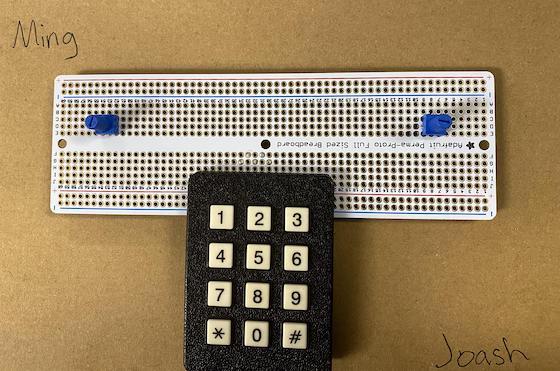
The user has four means of interacting with the Etch-A-Sketch. The first two potentiometers control the cursor's x and y positions. As the user turns the potentiometers, the cursor will move accordingly, with the left potentiometer controlling the x coordinate and the right controlling the y. The third is a keypad where the user can navigate a menu and select the various options, such as cursor color, pre-drawn shapes, and shape fill. Lastly, the user can shake the device to erase the contents of the drawing space.
Project Objective:
This project aimed to design and implement the Etch-A-Sketch on a Raspberry Pi Pico. This version would offer extended capabilities offering the user the ability to place pre-drawn shapes to aid in the ease of drawing.
Project Model
VGA Screen
High-level Design
Rationale and sources of project idea
We decided to create this well-known toy at a digital level, particularly intrigued by thinking how we can use potentiometers as cursors and the IMU to clear the screen, while also providing the nostalgia this kid’s toy invokes.
Background math
- Drawing menus
- Grid calculation: We divide the drawing menu into a 3x4 grid, as part of organizing and displaying our main menu, color menu, and shapes menu. To achieve this, we calculate the width, rectWidth, and height, rectHeight, of each grid cell by dividing the overall dimensions of the rectangle area reserved for the menu by 3 and 4, respectively.
- Positioning squares: For positioning squares within each cell of the grid, the program calculates the top-left coordinates (squareX, squareY) for each cell. It does this by adding the product of the column or row number with the width or height of a cell to the rectangle's starting position (rectX, rectY). This ultimately helps us place each menu item (text or shapes) within its designated cell.
- Displaying text and colors: The display of text and colors within these grid cells is managed through arrays that store the text labels and corresponding color values (colors and colorValue, respectively). Each piece of text is then displayed in the center of its respective grid cell. The positioning is calculated to be vertically central within the cell. This involved determining the vertical midpoint of each cell and then positioning the text accordingly. To do this, we first calculated the height of each cell in the grid by dividing the total height of the rectangle area (rectHeight) by the number of rows in the grid; so in our case, we divide rectHeight by 4. Then for each cell, to find the vertical midpoint, we take the top Y-coordinate of the cell (squareY) and add half of the cell’s height to it. Then, when displaying text in a cell, we use this calculated vertical midpoint as the Y-coordinate for the text. In terms of horizontal alignment, since each text is of a different length, we simply eyeball the text being centered by adding spaces in front of the text string. Additionally, the text in each cell is rendered in a color that corresponds to its value in the color array, essentially providing a visual to the user about the color they select. To do this, we take the colorValue array that stores the actual color values, where each element in this array represents a color code. Then we take the colors array that stores the text labels corresponding to the colors. It’s important to note that we align these two arrays in terms of indexing and use the same index to access both arrays i.e. if colors[0] is “Red”, then colorValue[0] would be the color code for red. We finally draw text in the square corresponding to its color by use of our custom drawText function, which call as: drawText(colors[row*3 + col], squareX, textY, colorValue[row*3 + col]). colors[row*3 + col] and colorValue[row*3 + col] are how the text is drawn and color is rendered, respectively. The row*3 + col calculation selects the correct text and appropriate color based on the current grid position, respectively, to ensure the color of the text matches the intended color for that grid cell. squareX is the x-coordinate where the text will start to be drawn i.e. horizontal position of text on the screen. textY is the y-coordinate for the text i.e. the calculated vertical center of the cell.
- Adding shapes: Based on shape drawing, we use the center point of each grid cell as a reference to draw the 9 different shapes.
- Adding shapes
- In terms of adding shapes to the drawing area, we first define the maximum size for each shape which is important to ensure that the shapes fit within the designated drawing boundaries. The position where the shape will be drawn is adjusted based on the current coordinates (x_coord, y_coord), read in from the potentiometer. This adjustment is important to keep the shapes within the confines of the drawing area (leftWall, rightWall, topWall, bottomWall).
- Shape drawing
- Users can place nine pre-defined shapes. Four shapes were able to be drawn using predefined functions (drawRect for two of our rectangles and one square, drawCircle for one circle). The other more complex five shapes (equilateral triangle, right triangle, pentagon, diamond, and star) were created using custom functions where we make use of the drawLine() to draw the shapes. Each complex shape function takes specific coordinates and a color as parameters. The specific coordinates represent a reference point of a vertex of a shape, which is the reference point with which to draw the rest of the shape. To fine-tune the exact coordinates and dimensions of these shapes, we mainly used a trial-and-error approach while using mental math for where to draw lines for creating the shape. We began by defining an approximate center (x,y) for each shape, which are the specific coordinates passed into each call of drawTriangle(), drawPentagon(), etc. The process of drawing each shape involved conceptualizing how each shape should look and then approximating the coordinates for where each line should begin and end, starting with the reference point vertex. These mental calculations of where to draw the lines to and from entailed estimating where the lines should start and end (and keeping the lengths of these lines proportional but for the most part these were the same length) and then tweaking the line coordinates and adjusting them until the shapes looked correct.
- Filled shapes
- We have a boolean variable, fillShapes, which determines whether shapes should be filled or not. This variable is toggled by user input on the main menu, triggered when clicking the “2” on the keypad. This is visually seen as text underneath the menu “Filled In” or “Not Filled In” based on whether fillShapes is true or false. Within our drawShapesMenu(), we add conditional logic based on the status of the fillShapes, and the same logic applies when adding a shape onto the drawing area in addShape(). The conditional logic simply states that for each shape if fillShapes is true, call the function to fill in the shape as opposed to outlining the shape. It’s important to note that we only filled in the four shapes that had predefined functions (fillRect() for the two rectangles and one square; fillCircle() for the one circle). While it is certainly possible to develop algorithms to fill the other shapes, we encountered significant mathematical complexity in these tasks. Creating fill algorithms for shapes beyond basic rectangles and circles requires more complex calculations. For instance, filling a pentagon or a star involves determining the internal area boundaries and efficiently coloring these without overlapping or leaving gaps. Such calculations go beyond standard line-drawing algorithms and venture into more advanced geometry. Given these complexities, we decided to prioritize other features and functionalities for the scope of this project.
- Dragging and Dropping Shapes
- The process of reading the potentiometer values and displaying them on the VGA screen is the same, where we first read values from the potentiometers connected to the ADC channels (via read_pots()) and then map these values to screen coordinates on the VGA screen (via map_value()). When the user wants to select a shape, they click on the shapes menu and the current shape selected will be tracked based on what button the user pressed (currShape variable that tracks which shape is selected which maps to the keypad button pressed within processButtonPressed()). So when a shape is selected (currShape is not “NoShape”), we used the potentiometer-based coordinates, x_coord and y_coord, to determine where on the screen the shape should be placed. In terms of drawing and redrawing shapes as the user is selecting them, the protothread_vga thread continuously checks if a shape is selected and, if so, calls addShape() to draw the shape at the current coordinates. Regarding the dragging effect, where once a user selects a shape they can drag it around using the potentiometers, we moreso create an illusion of this occurring as we redraw the shape at new coordinates every time the potentiometer values change. This is implemented by continuously updating x_coord and y_coord in read_pots() and redrawing the shape in addShape(). Before any shape is moved, the current state of the screen where the shape is currently is stored in vga_data_array_old. This array stores the previous state of the screen, which is what allows the program to restore it before redrawing a shape at a new position. This also ensures we are only dragging and dropping one shape, as opposed to leaving a trail of shapes across the screen. Additionally, pasteRect() is called after moving the shape to essentially erase any old pixel data on the screen (such as a shape being moved) and restore the background of that screen area.
- Sound Dirac Delta discovery
- While tearing a piece of a paper towel to dry my hands, I found that the sound of that rip was fairly similar to the sound we desired to generate when the user shook the device to clear the screen (like the sand rattling around an etch-a-sketch). I opened a spectrogram app to capture the sound and dissect the frequencies present and was surprised to find all frequencies were present. We used direct digital synthesis to generate this sound, but for the frequency generation, we generated noise using the rand function. We chose to generate frequencies between 1000 Hz and 8000 Hz. This range was chosen based on trial and error, originally picking between 1000 and 20000 Hz and narrowing down until we liked the sound generated.
- Debouncing buttons

Debouncing State Machine
Logical Structure
The program starts by initializing the various communication protocols, drivers and (non-preemptive round-robin scheduler) we use for threads. Our Raspberry Pi communicates with the DAC via SPI, and with the IMU via I2C. The program has 3 threads. The first thread is responsible for getting IMU accelerometer values and ADC values. It does this every 20000 micro seconds. The second thread is responsible for debouncing keypad presses. The last thread is responsible for drawing at the cursor and is signaled by the thread that gets ADC values.
Below is a list of all functions present in our program as well as important variables that govern our code behavior.
| Name | Description |
|---|---|
| main() | This function is responsible for initializing on-board peripherals as well as the second core and non-preemptive round-robin scheduler. This also sets up the repeating timer for sound generation. |
| core1_entry() | This is responsible for setting up the scheduler on the second core. |
| accelAndADCThread() | This thread is responsible for getting a new accelerometer magnitude from the IMU, and new x/y coordinates from the potentiometers. This thread runs every 20,000 microseconds. |
| repeating_sound_timer_callback() | This 40 kHz repeating timer is responsible for generating sound when the user shakes the board, erasing the screen. |
| protothread_vga() | This thread is responsible for drawing the cursor at the location indicated by the potentiometers. This thread is signaled by accelAndADCThread() through a semaphore called vga_semaphore. |
| protothread_debounce() | This thread is responsible for debouncing the button. If the thread determines that the button has been pressed, it will verify by iterating through the debouncing state machine. Once it is confirmed the button has been pressed and is stable, the current button that is pressed is passed to processButtonPress. |
| processButtonPress() | This function takes the button that was pressed on the keypad as an input and determines based on a case structure what action should be taken. Depending on the menu the user is in, various keys can have multiple meanings. For example, in FIGURE XXX, if the user is on the color screen, button 1 would mean they would like to select the color Red, but on the shapes screen, it would mean they would like to select the wide rectangle. This main menu they are on is monitored using the variable currentMenueState and depending on that, the appropriate action is taken. |
| keypadConfig() | This function initializes the various GPIO pins responsible for the keypad’s functionality. |
| spiConfig() | This function is responsible for setting up the SPI channel for communication with the DAC. |
| init_adc() | This sets up the two adc channels that control the x and y position of the cursor. |
| read_adc() | This function reads a specific ADC channel and returns the value read by the processor. |
| map_value() | This function converts ADC readings to x and y coordinates. |
| read_pots() | This function reads the value of both potentiometers by calling read_adc and map_value. |
| drawBounds() | This draws the white box around where the user draws. |
| drawSideMenu / drawColorMenu / drawShapesMenu() | These functions draw the menu on the right half of the screen. |
| soundConfig() | This function generates the sin table and amplitude modulation variables use for sound generation. |
| drawTriangle / drawPentagon / drawDiamond / drawStar / drawRightTriangle() | These helper functions draw their respective shapes at the cursor’s position. |
| clearMenu() | This function erases the current menu in preparation for a new one. |
| changeColor() | This function maps keypad presses to specific colors. |
| addShape() | This function processes keypad entry and converts it to a shape. It also handles out-of bounds placing to prevent any part of the shape from moving outside of the drawing screen. |
| getRandomInteger() | This function gets a random integer. |
| copyRect / pasteRect() | These functions are responsible for copying a section of the screen and pasting it back from vga_data_array_old. |
| copyPixel / pastePixel() | These functions copy and paste specific pixels to and from vga_data_array_old. |
| x_coord / y_coord | These are the x and y coordinates of the cursor. |
| currShape | This is the current shape the user has selected. |
| currColor | This is the current color the user has selected. |
| currentMenuState | This is the current menu shown on the right half of the screen. |
| vga_data_array_old | This is the double buffer of the section of the screen the user is drawing. This allows the user the ability to move a shape around the screen without destroying the contents of the screen. |
| isShaken | This indicates that the user has shaken the board. |
| fillShapes | This indicates the user has selected the option to draw filled shapes. |
Program/Hardware Design
Program Details
VGA data array
- To allow the user to select a pre-drawn shape and move it around the screen without affecting the contents of the screen, we needed to double-buffer the VGA data array. The VGA data array is an array of chars containing the pixel data for what is displayed on the screen. Each char contains the data for two pixels. The flow for adding this functionality is as follows. When the user selects a pre-drawn shape, copy the VGA data array into a secondary array (VGA_data_old) and draw the shape. As the user moves the pre-drawn shape around the screen, update the VGA data array with the contents of the VGA_data_old and redraw the shape. The easiest way to allow the user to move a shape around the screen would be to copy the entire VGA data array into VGA_data_old, however, the RPI Pico does not have enough memory to do so. Instead, what needed to be done was copy the section of the screen that the user would be drawing in. This is a better solution, as we would only be copying the contents of the screen that needed to be copied, and we significantly reduced the overall memory usage.
Translating the analog input from potentiometers to precise screen coordinates for smooth cursor movement
- This entails first reading the pot values, where the x-axis and y-axis control are connected to the ADC channels of the Pico. When the potentiometer dials are turned, the resistance is varied, changing the voltage at the output, which the ADC reads. The ADC converts this to digital values. The Pico’s ADC resolution of 12 bits, 8.7 of which are non-noise. Once the ADC values are obtained, we map this to the VGA screen. This is done in map_value(), which takes the ADC value and maps it to a coordinate on the screen. To scale the value in map_value(), we scale the input value from its original range (0 to adcMax) to the target range (min_out to max_out). The equation we used is: value * max_out - min_out / adcMax
Hardware details
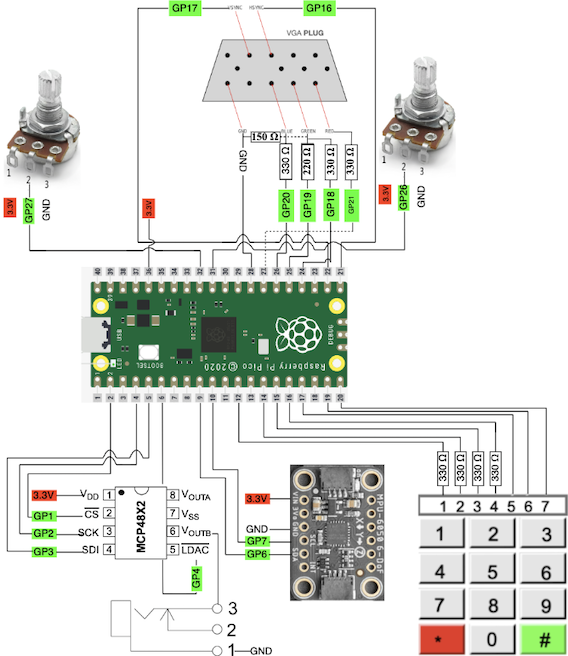
- Our hardware circuitry is designed for easy replication, as detailed in our schematic diagram. The design includes a Raspberry Pi Pico microcontroller board, which interfaces with a DAC to display audio using the SPI protocol. It also incorporates an IMU MPU 6050 for detecting shakes to clear the screen, utilizing the I2C protocol. A keypad is integrated for navigating menus and selecting options, functioning through monitoring inputs on GPIO pins. Additionally, two potentiometers are employed to control the direction of movement and adjust the x and y positions by reading ADC channel values. Finally, the setup includes a VGA screen connector, which is essential for displaying the game on a monitor.
Hardware Schematic
Results
Speed of execution
- Two issues arise regarding flicker and jitter. One is when dragging filled-in shapes, the shape constantly flickers, which most likely arises because the program must erase the old shape and redraw it at a new location. The other issue arises in drawing lines when controlling the potentiometers. If the readings are stationary or not, there is a jitter to draw random pixels about the actual location of the potentiometer reading. This is due to noise caused by the potentiometers and could be removed by purchasing better quality components.
- We also use multicore processing (multicore_launch_core1()), which allows for different tasks to be executed simultaneously on different cores of the RP2040 utilizing a semaphore (vga_semaphore) and protothreads to handle multiple tasks concurrently (such as reading sensor data and updating the display).
- Our primary “physical” user interactiveness comes when the user navigates through the different menus using the keypad. The debouncing logic ensures button presses are accurately registered without false triggers and without adding any noticeable delay.
Accuracy
- We make use of fixed-point arithmetic, specifically for handling calculations with acceleration data and in the sound synthesis process, to offer more precision in our calculations.
- We also use DDS for sound generation (of clearing the screen) with a phase accumulator and sine table lookup. The frequency accuracy here depends on the size of the sine table (256) and the sampling rate (40000 Hz). This results an accumulator accracy of 9.31 uHz.
- We control the VGA display using GPIO pins on the RP2040, where the timing accuracy is largely dependent on the RP2040’s clock speed and how well the VGA driving code is optimized.
- We properly map the ADC values to screen coordinates in map_value(), which accurately reflect the range and sensitivity of the potentiometers. If we misalign this mapping, there could be imprecise cursor movement or inaccurate readings being displayed (for example, turning the knob and the readings jump inconsistently instead of giving a relatively smooth line)
Safety in the design
- Our debouncing logic ensures safety regarding reliable input from the keypad, as it filters out noise that could occur when a button is pressed or released. Using a time delay in the debouncing thread (PT_YIELD_usec(30000)) provides enough time for the button to stabilize.
- In drawing functions and ADC-to-screen mapping, we check to ensure that drawing operations and shape placements stay within the defined screen boundaries. This would prevent errors like buffer overflows, which could lead to some possible unpredictable behavior or program crashes.
- To prevent the user from prodding, pricking, or shocking themselves, the device is placed inside a box and the user only has access to parts that should be interacted with.
Inclusivity
- To extend usability to those with color vision deficiency, printing out the color selected by the user mitigates the issues that could be encountered.
Conclusions & Future Work
Our design meets the expectations set in the proposal. A future improvement our group would like to include is additional filled-in shapes. The few shapes that were filled in were able to be generated quite easily, but due to time constraints, shapes like the star or the triangle were not given this feature. Second, our group would like to use the DMA channels to move data from the ADC’s to the program without CPU cycles. There isn’t an inherent reason to do so as the program runs into no timing issues, it would just be interesting to do.
Intellectual property considerations
- Did you reuse code or someone else's design?
- Are you reverse-engineering a design? How did you deal with patent/trademark issues?
The code for this lab was either developed using previous laboratory assignments written by Professor Land and Professor Adamns as a starting point or was entirely developed for this assignment.
Professor Land: 4 - Bit Color
Course Code: IMU Interface, Debouncing, Fixed Point Arithmetic, Protothreads, Direct Digital Synthesis
We have made a device similar to the Etch-A-Sketch, but since we have included several different features and made a completely different interface, we are not infringing upon trademark rights. However, because of this, this project is neither patentable nor sellable.
Appendix A
The group approves this report for inclusion on the course website. The group approves the video for inclusion on the course youtube channel.