Edward Gu (elg227) & Filipe Branco (fad28)
ECE 4760 Final Report
ChatGPT Pico Melodies
Sound Bite: We demonstrate a ChatGPT user interface for music generation with a keypad connected to an RP2040.
Summary[a]: In this project, we successfully built an audio synthesizer that plays musical melodies of various lengths and styles generated by ChatGPT. The user has control over the key the melody is in via presses of a keypad, as well as control over the length and style of the generated melody through simple edits to the prompt. Our implementation consists of a python file that uses the ChatGPT API to produce the melodies (run on the host computer), and a C file that runs on the RP2040 and communicates with the python file by sending the key pressed to the host and receives the melody from the host.
Given the rise of LLMs such as GPT4, we were inspired by how powerful and capable such AI models were, especially in the creative domain. Our group was interested in leveraging the OpenAI API to ‘talk’ to GPT4 and have it send information back and forth with our RP2040, in the hopes of being among the first to utilize the capabilities of ChatGPT on the edge in this way. One natural way to accomplish this is to use the Pico for inputting information, via a keypad, to ChatGPT, and then receive the parsed output from ChatGPT to output the GPT generated melody. We decided to correspond each key on the keypad to a musical note: for example 1 on the keypad would correspond to the note A, 2 on the keypad would correspond to the note B, etc. Once the user presses on any of the first 7 keys (A to G), that note would be included in the prompt to ChatGPT, asking the model to generate a short melody of 10 notes (could be more notes or less notes, although we discovered some prompt limits which we will discuss later on) in the major key (could be minor or augmented or diminished or anything else). In order to use the ChatGPT API, we had to pay $30 worth of tokens in order to prompt the model during all of our testing and our demo. The most challenging aspect of this project was figuring out the sending and receiving of data between the python file (host computer) and the C file (RP2040).
Initially, we wanted to port a lightweight trained model for speech detection onto the Pico for inference. Hence, we experimented with Tensorflow Lite and micropython, with the hopes of having a person speak into a microphone their health symptoms, have a pre-trained ML model on the Pico parse and understand the speech in real-time, send this data to ChatGPT to process and come up with a diagnosis or ask follow-up questions, and then send the model output back to the Pico to be output through a speaker. However, after numerous discussions we decided that the RP2040 Pico was not naturally designed for running ML models, which requires hefty storage of all of its parameters. Instead, we can have an ML model, still ChatGPT, run on servers designed to host the pretrained models, and have it also act as a user interface with the Pico, where the Pico can then operate with its natural intent - user can interact with the Pico via keypad and the Pico can output music. We chose to go with GPT music generation because 1) we wanted to test out the creativity capabilities of ChatGPT (e.g. turning on and off an LED or controlling a car’s turning are tasks where using ChatGPT seems superfluous/unnecessary), 2) this task is very feasible for LLMs to accomplish, 3) we can easily evaluate how good the model output is just by listening to the melody and see if it sounds good/as expected or not (e.g. Is the first note the note of the key that was pressed? Is the melody in the right key?), and 4) we liked music. There were certainly plenty of resources available online about using the ChatGPT API and prompt engineering, which we utilized for this project. Because our project required sound output and some form of a keypad, we used Lab 1 as influence for both our hardware setup and software implementation.
There aren’t many additional hardware related tradeoffs different from lab 1, since our hardware setup is almost identical to lab 1. There aren’t any existing patents, copyrights, or trademarks that are relevant to our project.
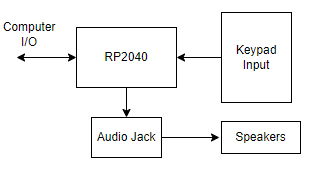
The Program to Hardware connections are as follows:
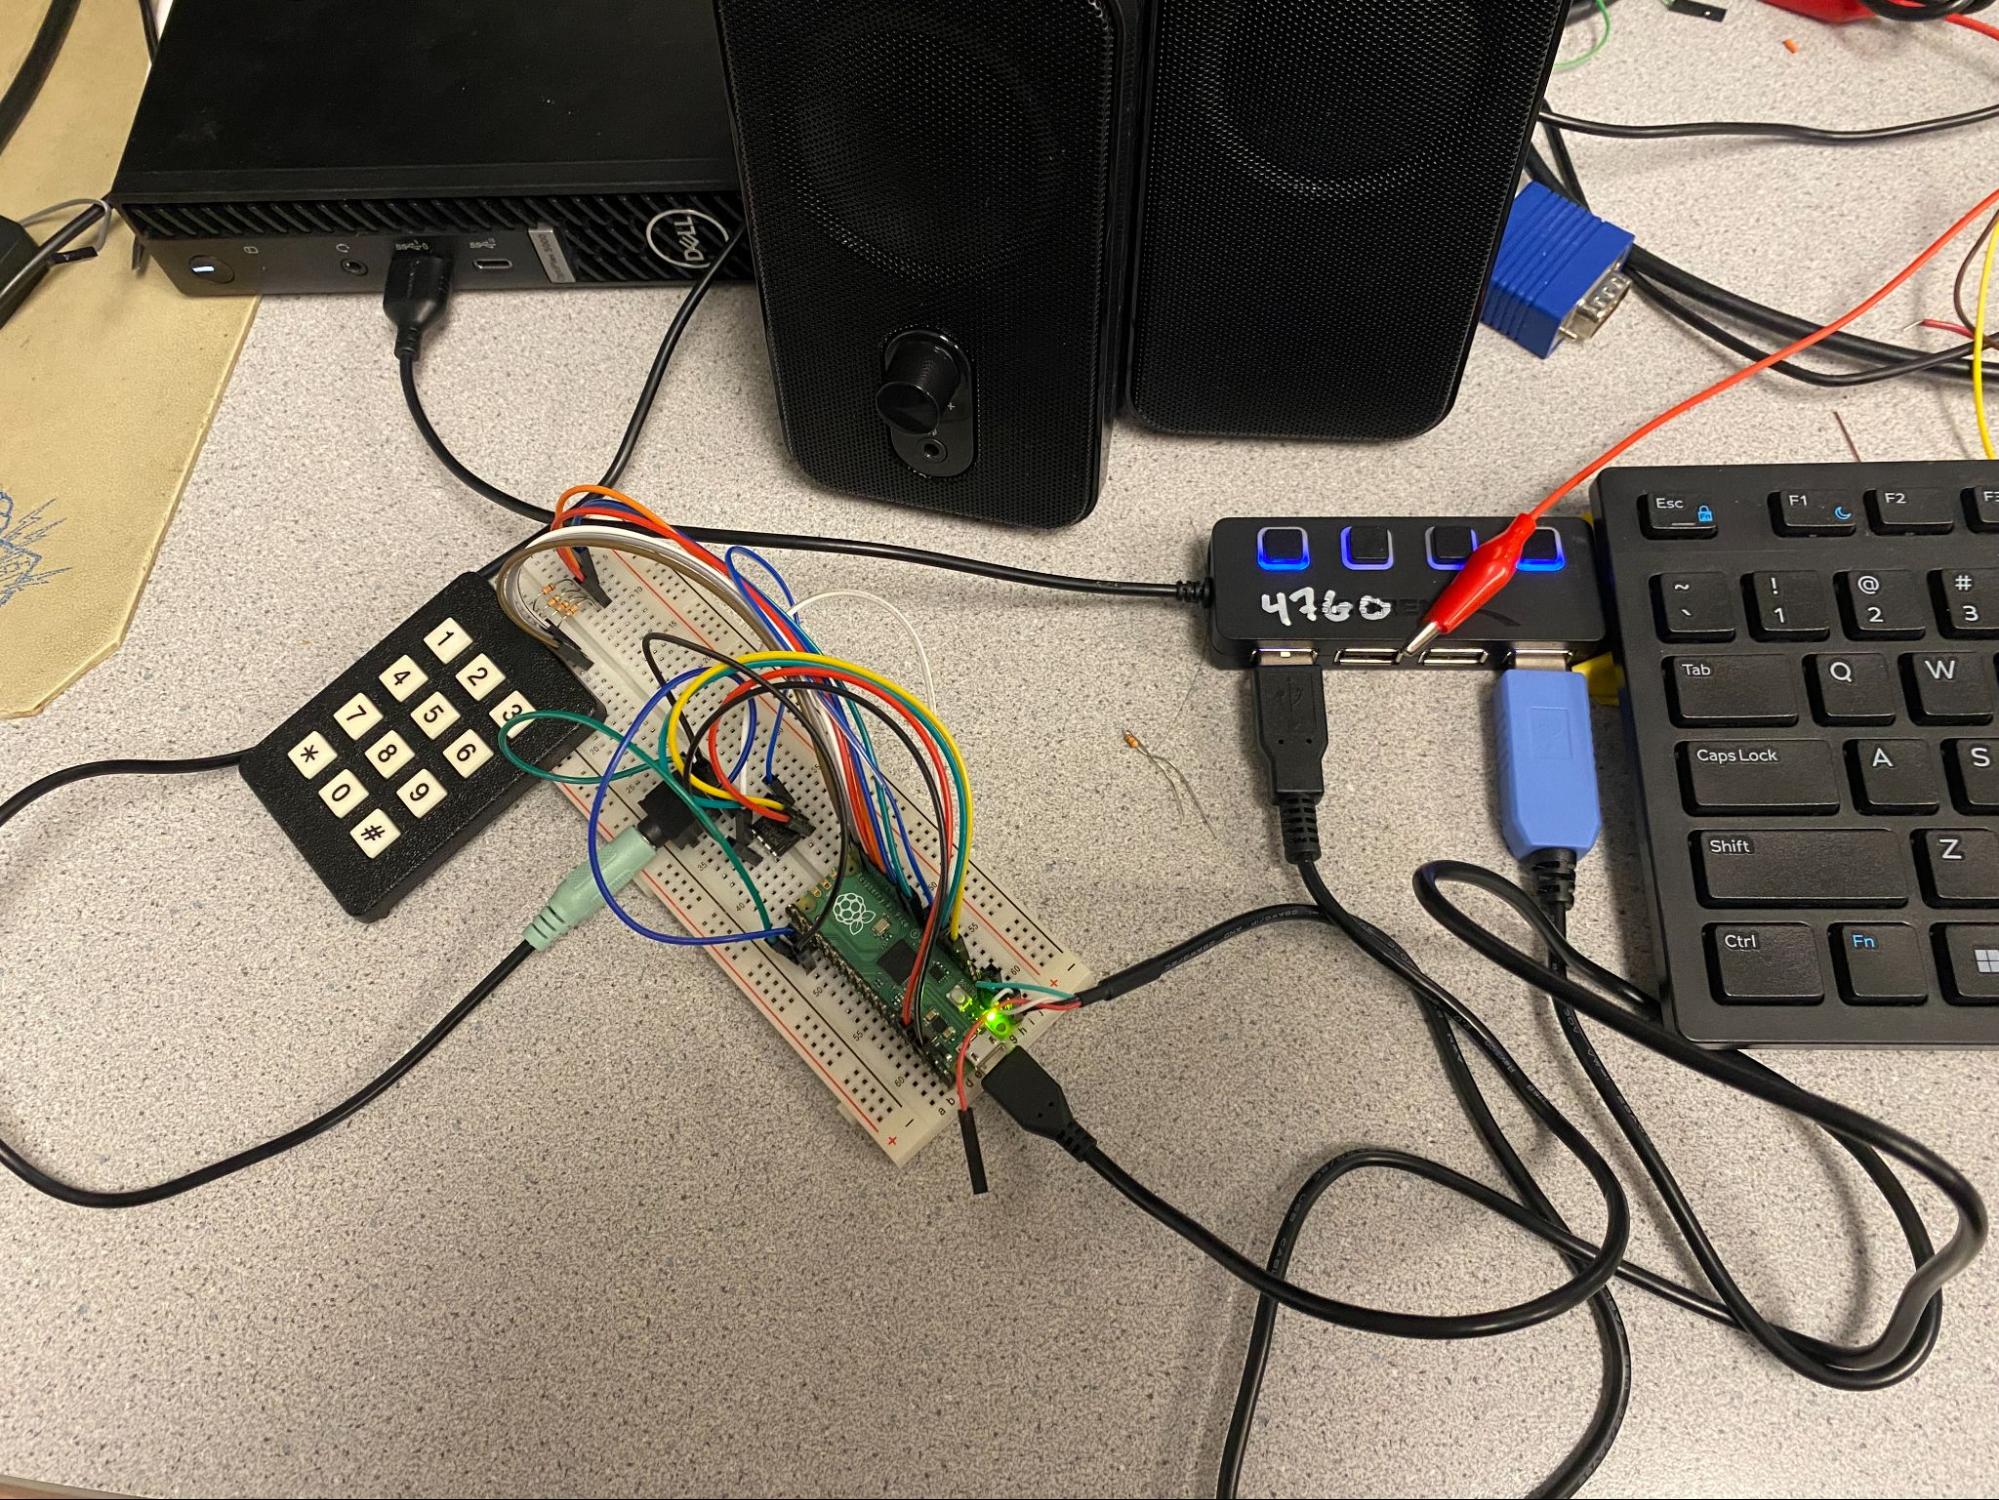
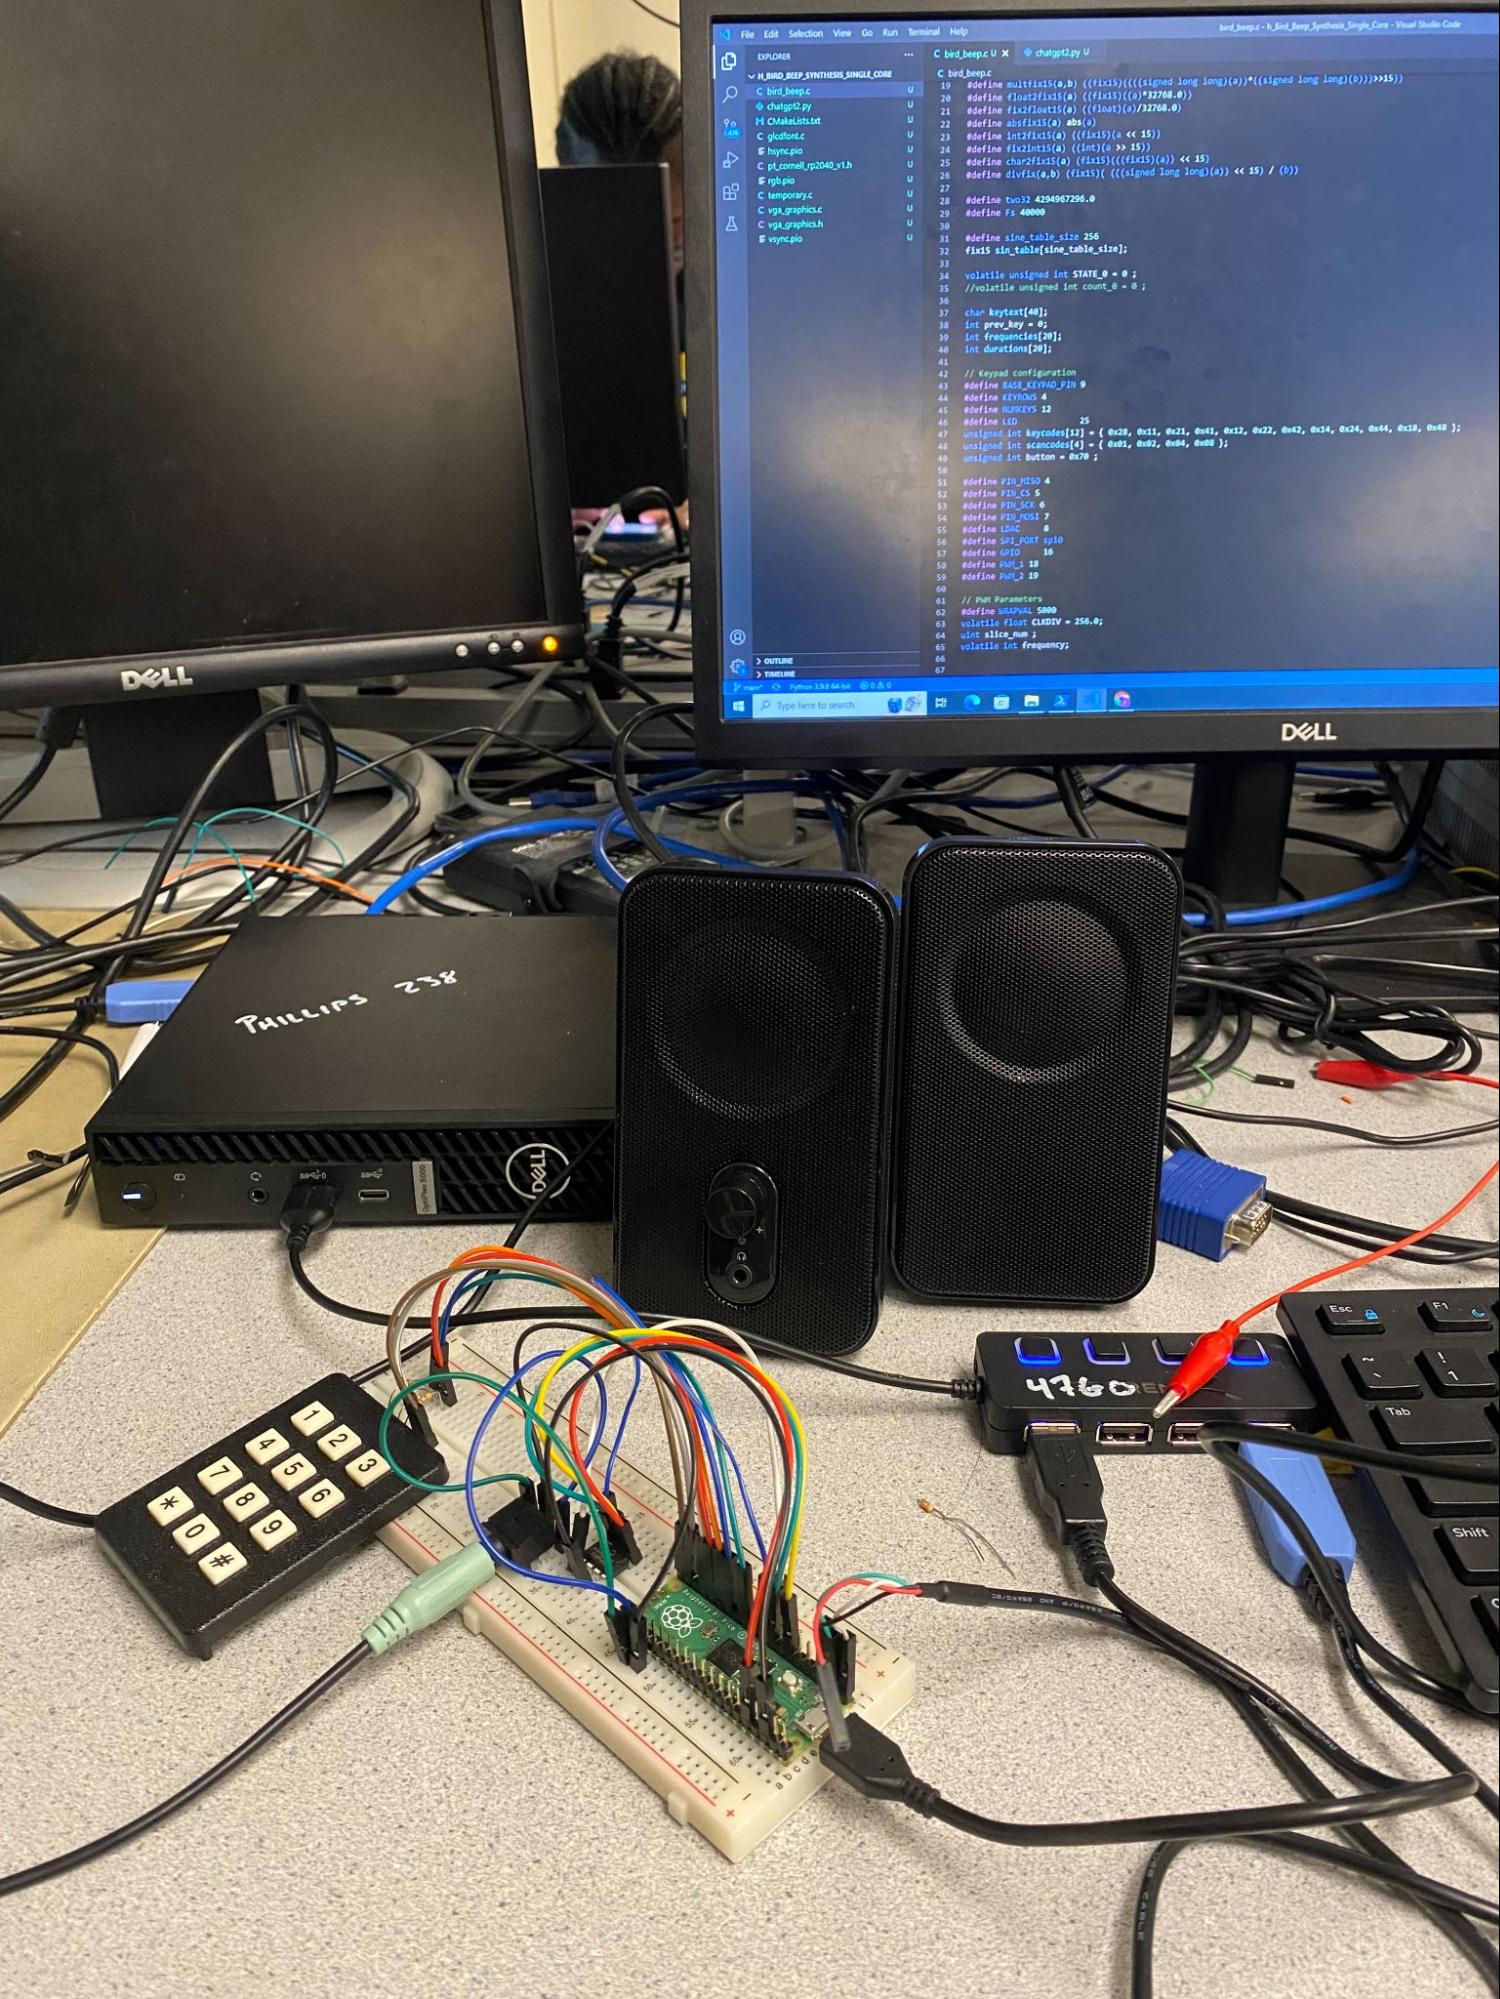
Figure 1: Hardware Setup
Figure 2: Hardware setup (top view)
In Figures 1 and 2, we can see the hardware implementation including the keypad on the bottom left where we send input signals to the DAC. It is almost identical in setup to the Bird Sound Synthesis lab – it is connected to the RP2040 which is located on the right and connected to the lab computer as well as the serial jack (seen in the blue), and the audio jack which feeds into a speaker via a 3.5mm audio socket that outputs generated beeps. The DAC is connected (to send SPI signals) to the Pico by connecting each of the ports following the DAC datasheet and the #define statements in the source code. The DAC pins are VDD, chip select, the clock line, SDI (same as MOSI), VoutA (one of the outputs), VSS is ground, VOUTB (the other output) and the LDAC pin. The LDAC pin allowed us to separately load the left and right channels for the DAC and then, when that pin is toggled, both are sent to the output simultaneously. A similar procedure was done for the 3.5mm audio socket, which had two pin configurations, not including its GND of course.
Figure 3: Diagram of Hardware Setup
Because the ChatGPT API is a python library that can easily be imported, we chose to have one file dedicated to solely running all of the ChatGPT-related calls. In our python script, run by the host computer, we modularized our code into 3 primary functions, one that uses the openai library to prompt ChatGPT and receive its response, one that corresponds each musical note into its corresponding frequency that can be output by the Pico, and one that cleans and processes the response from ChatGPT.
In the chat_with_gpt_for_melody(note_key) function, we include our personal OpenAI API key, our prompt, and the ChatCompletion.create(model=”gpt-4”, messages=[{“role”: “system”, “content”: “You are a helpful music assistant.”}, {“role”: “user”, “content”: prompt}]) which asks ChatGPT to give us our melody output. This function is highly customizable, but we mainly wanted to demonstrate the baseline concept of using the ChatGPT API in this project. The prompt that worked most consistently for us was:
"Create a short melody of 10 notes in the key of {note_key}. Make sure that the first note is the {note_key}. Provide the notes and their durations in a list. Example format: [A4,500,B4,300,C5,400]".
Note_key here is the parameter that is passed in from the C file that handles the Pico key press, and we include that here in our prompt. We realized that if we did not include the example format, ChatGPT would not reliably always output the array that we ultimately wanted. The output of this function contains the entire output from ChatGPT, including the key piece of information which is a list of music notes and their corresponding durations in milliseconds in the immediate next element of the list (e.g. [A4, 400, B4, 500, F5, 250]). We tried including things in our prompt that would cause ChatGPT to output melodies in different styles (e.g. Christmas) or different clefs (e.g. treble or base), and it was able to generate melodies that matched such modifications to our prompt, but not entirely reliable every time (more qualitative than quantitative as well).
The next function note_to_frequency(note) simply contains a dictionary of notes (e.g. A4, B4, C#5) as the keys and their corresponding frequencies as the values. We only included 22 notes here out of at least 88 possible keys (of the piano) for simplicity. The function would take in the parameter of the note, and return its corresponding value from the dictionary.
The clean_melody_response(response) function is necessary because everytime ChatGPT outputs a response, it contains a lot of extraneous information (to act more like a chatbot rather than a search engine) besides the array of music notes and durations that we ultimately want. Thus, we need to go through each character of the output and only keep the information contained within square brackets (e.g. [A4, 400, B4, 500, F5, 250]). Afterwards, we use the note_to_frequency function to convert every other element of the list (starting from the first element) into its corresponding 3-character frequency.
In our main function, we have one continuously running while loop that is constantly listening for incoming data from the Pico (which is the key press). Once it receives the data via serial (using ser.readline() where ser is imported pyserial library), it calls the chatgpt function to get the melody, cleans the melody using the clean melody function, and then writes the cleaned melody in the form of a string, back to the RP2040 using ser.write(melody.encode()). Because we are using one COM port to communicate through from both the python file (host computer) and the C file (Pico), we can’t use PuTTy to see what is being printed out at each step of the pipeline, we chose to use the python file to print out everything that the user sees, such as what the melody list produced by GPT and played by the Pico looks like, or what key they pressed.
In our C script, we have 2 protothreads, one that is responsible for scanning the keypad and sending the pressed key over to the host computer, and one that is responsible for parsing and playing the melody. Most of the libraries that we need are kept from Lab1, with the exception of defining 2 PWM pins (18 & 19) and PWM parameters such as CLKDIV, slice_num, and frequency.
Our first thread contains a while loop that is always running (we can physically see this with a blinking LED) and a for loop that is scanning the entire keypad continuously until a button is pressed and the musical note corresponding to that button is sent to the host computer for ChatGPT processing. Once a button is pressed, we look for a valid keycode (12 possibilities on the keypad) and if there exists one (both button, keycodes[12], and scancodes[4] are unsigned global integer variables) then we proceed to the logic that determines which musical note key to be sent to the python file. If the current key does not equal the previous key and State0 equals 0 (default is that State0 = 0), then we find the if branch that matches the key that we pressed (e.g. 1, 2, 3,..., 7) and within the conditional branch, call uart_puts(uart0, “major key\n”) and change State0 to 1. The uart_puts function sends the string containing the note key pressed to the python file, which can then be included in the prompt sent to ChatGPT. The purpose of changing the volatile unsigned int State0 is so that thread 2 knows when to execute the parsing and playing of the melody whenever State0 is equal to 1 (thread 2 doesn’t execute if State0 is equal to 0). Ultimately, setting the variable of State0 did not end up mattering when we moved away from the ISR, especially since thread 2 wouldn’t execute anyway until data is received from the python file, which only occurs after thread 1 sends the note pressed.
The second protothread that we have running at all times is used to receive the output from ChatGPT via serial_read, parse the list of frequencies and durations into separate arrays containing just the frequencies and just the durations, and then play the melody using PWM. We have 2 global int arrays defined as frequencies[] and durations[] of fixed length 10 or 20 (size of array depends on how many notes we want ChatGPT to generate). The static variables that we maintain within this thread are int note_count = 0, bool is_frequency = true, and char *token. We first call serial_read which waits for serial data to be read, and then we check if data is received in the pt_serial_in_buffer and if State0 equals 1. If data is received, we parse the received string token by token, separated by commas. If the current token isn’t NULL and the note_count is less than the size of the list (if there are 10 notes played, then there are 10 frequencies and 10 durations in the list, so the size will be 20), then we store the values of each token in the frequencies and durations lists. The first token stored will always be in the frequencies list, and the second token will always be in the durations list, and this pattern will alternate until a NULL character is found at the end (thus the size of the list will always be an even number). To handle storing in different lists each time, we have a simple boolean flag is_frequency that controls such execution: if it is true then the note will be stored in the frequencies list and is_frequency is set to false, if it is false then the note will be stored in the durations list and is_frequency is set to true. The loop ends when the current token from the buffer is a null character, indicating the end of the list. Once we have both of our lists, we have a for loop that loops through both lists and plays the melody. We call pwm_set_wrap(slice_num, WRAPVAL) and then pwm_set_clkdiv(slice_num, CLKDIV) where CLKDIV uses each element of our frequencies list. We set the channel level of one of our PWM ports to be 2500 and enable the mask to play a note. This note will play for the amount of time defined in each element of our durations list (using sleep_ms). Then the note stops playing by calling the same PWM functions as before (except enabling the mask) but setting the channel level of the PWM port to be 0 causes the note to stop playing. We also add a 100 ms delay between each note being played.
In the main function, we simply keep all of the relevant initializations for UART, PWM, GPIOs, etc. and add our 2 threads. Whenever we want to demo our project or test to see if the entire process works, we simply build the CMake files (same as lab 1 with the exception of adding PWM), move the beep_beep uf2 file into our Pico, and then run the ChatGPT python file. The user will be asked to press a key on the keypad, where the prompt explains that pressing 1 equals A major, 2 equals B major, etc. Once the key is pressed, there will be a few seconds (under 5 seconds) of waiting time for ChatGPT to generate its response, and then the melody can be heard on the speakers.
There were many issues that we encountered throughout our implementation and overcame. Firstly, we tried to use an ISR for DDS to output the melodies, however, we would always run into concurrency issues that stemmed from the ISR. Sometimes, the melody would not be played at all and an infinite loop would result; other times only 3 or 4 notes of the melody would be played. We think these weird behaviors may have been caused by our lack of a well-defined debouncing machine, even though we did not really need one since the user only presses the keypad once for a melody to be played and if the user chooses to press the keypad multiple times, only the first key press will be registered. We thought that the ISR might be interfering with our sending data back and forth between the Pico and the host computer, but print statements showed that data was indeed being sent and received. Because debugging the sound output was tedious, we decided to try out PWM instead, which only required two additional GPIO pins to set up and did not need any ISR or DDS. This way we can include our logic for playing the melody within one of our protothreads directly, which makes the multithreading issues much simpler to resolve. By using PWM, we immediately had a successful output of the melody through the speakers and it would work just about every time without fail.
Previously, instead of using serial_read to get the entire string from the python file, we tried using uart_getc (there was no method called uart_gets, which would supposedly get the entire string much like uart_puts puts the entire string to the serial connection) which gets every character individually from the buffer. This method was not only much more tedious, increasing the time complexity, but also did not work reliably due to concurrency issues. We tried storing the tokens from uart_getc in both a character array as well as an integer array, but both could not resolve these issues.
Another issue that we faced was the prompting of ChatGPT being volatile, since the chatbot would not reliably output what we wanted every single time. We also found that our current prompt doesn’t work so well with very few notes (<3) or too many notes (20<), so modifications to the prompt will need to be made to accommodate these changes.
We were successful in having ChatGPT produce an interesting melody in the key that we pressed and we verified through using the oscilloscope and an iPhone app that the frequencies that were being output corresponded to the correct notes. Overall, the first note that was produced in the melodies was the key that we pressed, which we wanted. The rest of the notes would be in the key of the note that we pressed and the number of notes in the melody would always correspond to the number of notes we specified in the prompt to ChatGPT. The melodies themselves would have arpeggios and some scales (consecutive notes up or down the measure) and sounded pleasant.
The speed of the execution is almost entirely dependent upon how quickly ChatGPT would be able to generate the melody based on our prompt. Thus, we focused on making our prompt as reliable and concise as possible so that ChatGPT would spend just a few seconds to produce the melody. Otherwise, there is very low latency between the time when the user presses the keypad to when sound is output through the speakers. After switching to PWM, we no longer faced any concurrency issues that hindered us greatly in our DDS implementation.
Our project has no safety concerns that we can think of. The project is highly usable for anyone since all that is required to generate melodies
Overall, we were proud of our final project and ultimately succeeded in having ChatGPT generate different melodies each time a new key is pressed. Our expectations since the start of the project were met, although there are many improvements that can be made. I think our structure of having a python file in charge of using the ChatGPT API and a C file that handles the Pico controls, and communicating over UART and Serial works well with low latency. We were initially worried that the prompting of ChatGPT would be too volatile and would not output the correct array of frequencies and durations (or even an array at all), but after thorough prompt engineering, the output from ChatGPT works almost 100% of the time. Our testing methodology of using the python script to print out what is going on at every stage of the pipeline, whether that’s in the protothreads or in the python function, was crucial in our debugging.
Given more time, we wanted to completely finish adding a record mode by pressing 0 on the keypad, where many keys can be pressed (until the 0 key is pressed again), so that we can have an initial melody of a few notes that chatgpt can then take to create an even more elaborate melody, instead of creating a melody solely based on one key press. We can then save whatever melody was generated in some database file so that if the user wanted to play it back in the future, they could do so easily. If such data was stored, there could be much more elaborate songs/compositions that can be constructed by GPT, just by simply prompting it with multiple melodies that it had prompted earlier. We wanted to push the limits to see if it can generate different harmonies (chords perhaps) instead of just a singular melody
We adapted our C code from lab 1 due to its similarity with what we were trying to achieve, although our code differs due to additional protothreads, using PWM instead of an ISR for DDS, not using a VGA display, and overall logic. We did not use any of Altera’s IP, did not code in the public domain, did not need to deal with patent/trademark issues, and did not have to sign a non-disclosure agreement to get a sample part. There are certainly a myriad of future possibilities that combine LLMs with embedded devices that may lead to patent opportunities.
Both members contributed to all aspects of the project, these were the focuses of each team member:
import serial
import openai
import time
import re
# Initialize the serial connection to the RP2040
com_port = 'COM3'
baud_rate = 115200
ser = serial.Serial(com_port, baud_rate, timeout=1)
def chat_with_gpt_for_melody(note_key):
openai.api_key = ''
prompt = f"Create a short Christmas melody of 10 notes in the key of {note_key}. \
Make sure that the first note is the {note_key}. \
Provide the notes and their durations in a list. \
Example format: [A4,500,B4,300,C5,400]"
response = openai.ChatCompletion.create(
model="gpt-4",
messages=[{"role": "system", "content": "You are a helpful music assistant."},
{"role": "user", "content": prompt}]
)
return response.choices[0].message['content']
def note_to_frequency(note):
note_frequencies = {
'A4': 440, 'B4': 493, 'C4': 261, 'C#4': 277, 'D4': 293, 'D#4': 311, 'E4': 329,
'F4': 349, 'F#4': 370, 'G4': 392, 'G#4': 415, 'A5': 880, 'B5': 987, 'C5': 523,
'C#5': 554, 'D5': 587, 'D#5': 622, 'E5': 659, 'F5': 698, 'F#5': 740, 'G5': 784, 'G#5': 830,
# Continue for other notes as needed
}
return note_frequencies.get(note, -1)
def clean_melody_response(response):
melody_matches = re.findall(r'([A-G][#b]?[0-9]),(\d+)', response)
melody = []
for note, duration in melody_matches:
frequency = note_to_frequency(note)
if frequency != -1: # Check if the note was found
melody.append(f"{frequency},{duration}")
return ','.join(melody)
def main():
#print("Connected to", ser.name)
print("Press any key on keypad to generate a short melody from that key. 2 corresponds to A major, 3 corresponds to B major, ..., 8 corresponds to G major.")
while True:
# Read data sent from the RP2040
incoming_data = ser.readline()
if incoming_data:
note_key = incoming_data.decode().strip()
print("Received from RP2040:", note_key)
# Get a melody from ChatGPT based on the note key
raw_melody = chat_with_gpt_for_melody(note_key)
melody = clean_melody_response(raw_melody)
print("Melody from ChatGPT:", melody)
# Send the cleaned melody back to the RP2040
ser.write(melody.encode())
print("Sent to RP2040:", melody)
# Wait for a stop command
# while True:
# if ser.in_waiting > 0:
# stop_data = ser.readline().decode().strip()
# if stop_data == "s": # Assuming "s" is the stop command
# print("Stop command received from RP2040")
# return # Break out of the main function
# time.sleep(1)
time.sleep(1)
if __name__ == "__main__":
main()
// Include necessary libraries
#include <stdio.h>
#include <math.h>
#include <string.h>
#include "pico/stdlib.h"
#include "pico/multicore.h"
#include "hardware/pio.h"
#include "hardware/dma.h"
#include "hardware/spi.h"
#include "hardware/sync.h"
#include "hardware/pwm.h"
// Include protothreads
#include "pt_cornell_rp2040_v1.h"
#define two32 4294967296.0
#define Fs 40000
#define sine_table_size 256
fix15 sin_table[sine_table_size];
volatile unsigned int STATE_0 = 0 ;
//volatile unsigned int count_0 = 0 ;
char keytext[40];
int prev_key = 0;
int frequencies[20];
int durations[20];
// Keypad configuration
#define BASE_KEYPAD_PIN 9
#define KEYROWS 4
#define NUMKEYS 12
#define LED 25
unsigned int keycodes[12] = { 0x28, 0x11, 0x21, 0x41, 0x12, 0x22, 0x42, 0x14, 0x24, 0x44, 0x18, 0x48 };
unsigned int scancodes[4] = { 0x01, 0x02, 0x04, 0x08 };
unsigned int button = 0x70 ;
#define PIN_MISO 4
#define PIN_CS 5
#define PIN_SCK 6
#define PIN_MOSI 7
#define LDAC 8
#define SPI_PORT spi0
#define GPIO 16
#define PWM_1 18
#define PWM_2 19
// PWM Parameters
#define WRAPVAL 5000
volatile float CLKDIV = 256.0;
uint slice_num ;
volatile int frequency;
#define DAC_config_chan_A 0b0011000000000000
#define DAC_config_chan_B 0b1011000000000000
// This thread runs on core 0
static PT_THREAD (protothread_core_0(struct pt *pt))
{
// Indicate thread beginning
PT_BEGIN(pt) ;
static int i ;
static uint32_t keypad ;
while(1) {
gpio_put(LED, !gpio_get(LED)) ;
// Scan the keypad!
for (i=0; i<KEYROWS; i++) {
// Set a row high
gpio_put_masked((0xF << BASE_KEYPAD_PIN),
(scancodes[i] << BASE_KEYPAD_PIN)) ;
// Small delay required
sleep_us(1) ;
// Read the keycode
keypad = ((gpio_get_all() >> BASE_KEYPAD_PIN) & 0x7F) ;
// Break if button(s) are pressed
if (keypad & button) break ;
}
// If we found a button . . .
if (keypad & button) {
// Look for a valid keycode.
for (i=0; i<NUMKEYS; i++) {
if (keypad == keycodes[i]) break ;
}
// If we don't find one, report invalid keycode
if (i==NUMKEYS) (i = -1) ;
}
// Otherwise, indicate invalid/non-pressed buttons
else (i=-1) ;
// Logic to determine what sounds to play
/* Only interested in key transitions where the
current key does not equal previous key */
if (i != prev_key && STATE_0 == 0) {
// key 1 -> A major key
if (prev_key != 1 && i == 1) {
uart_puts(uart0, "A major\n");
STATE_0 = 1;
}
else if (prev_key != 2 && i == 2) {
uart_puts(uart0, "B major\n");
STATE_0 = 1;
}
else if (prev_key != 3 && i == 3) {
uart_puts(uart0, "C major\n");
STATE_0 = 1;
}
else if (prev_key != 4 && i == 4) {
uart_puts(uart0, "D major\n");
STATE_0 = 1;
}
else if (prev_key != 5 && i == 5) {
uart_puts(uart0, "E major\n");
STATE_0 = 1;
}
else if (prev_key != 6 && i == 6) {
uart_puts(uart0, "F major\n");
STATE_0 = 1;
}
else if (prev_key != 7 && i == 7) {
uart_puts(uart0, "G major\n");
STATE_0 = 1;
}
prev_key = i;
}
PT_YIELD_usec(30000) ;
}
PT_END(pt) ;
}
static int pt_state_0_thread(struct pt *pt) {
PT_BEGIN(pt);
static int note_count;
static bool is_frequency;
static char *token;
while (1) {
// Reset variables for each iteration
note_count = 0;
is_frequency = true;
// Wait for serial data to be read
serial_read;
//PT_YIELD(pt); // Yield to allow time for data to be read
// Check if STATE_0 is 1 and if data is received
if (pt_serial_in_buffer[0] != '\0' && STATE_0 == 1) {
printf("Received serial data: %s\n", pt_serial_in_buffer);
// Parse the received string
token = strtok(pt_serial_in_buffer, ",\n");
while (token != NULL && note_count < 20) {
int current_number = atoi(token);
//printf("Parsed number: %d\n", current_number);
if (is_frequency) {
frequencies[note_count] = current_number;
//printf("Stored frequency[%d]: %d\n", note_count, frequencies[note_count]);
is_frequency = false; // Next number will be duration
} else {
durations[note_count] = current_number;
//printf("Stored duration[%d]: %d\n", note_count, durations[note_count]);
note_count++;
is_frequency = true; // Next number will be frequency
}
token = strtok(NULL, ",\n");
}
// Play the melody
for (int i = 0; i < note_count; ++i) {
pwm_set_wrap(slice_num, WRAPVAL);
CLKDIV = 125000000 / (frequencies[i] * (WRAPVAL + 1));
pwm_set_clkdiv(slice_num, CLKDIV);
pwm_set_chan_level(slice_num, PWM_2, 2500);
pwm_set_mask_enabled((1u << slice_num));
sleep_ms(durations[i]);
pwm_set_wrap(slice_num, WRAPVAL);
CLKDIV = 256.0;
pwm_set_clkdiv(slice_num, CLKDIV);
pwm_set_chan_level(slice_num, PWM_2, 0);
// Optional: delay between notes
sleep_ms(100); // 100 ms delay between notes
}
}
// Yield to allow other protothreads to run
PT_YIELD(pt);
}
PT_END(pt);
}
// This timer ISR is called on core 0
// bool repeating_timer_callback_core_0(struct repeating_timer *t) {
// if (STATE_0 == 2) {
// unsigned int phase_accumulator = 0;
// unsigned int phase_increment;
// int num_samples;
// int DAC_output;
// uint16_t DAC_data;
// // static int test;
// // test = 1000000;
// // uart_puts(uart0, test);
// // printf("Received frequency 2: %d\n", test);
// // Loop through each note
// for (int note = 0; note < 3; note++) {
// phase_increment = (frequencies[note] * two32) / Fs;
// num_samples = (Fs / 1000) * durations[note];
// printf("Frequency in ISR: %d", frequencies[0]);
// for (int i = 0; i < num_samples; i++) {
// phase_accumulator += phase_increment;
// DAC_output = fix2int15(multfix15(sin_table[phase_accumulator >> 24], int2fix15(1))) + 2048;
// DAC_data = (DAC_config_chan_A | (DAC_output & 0xffff));
// spi_write16_blocking(SPI_PORT, &DAC_data, 1);
// sleep_us(1000000 / Fs);
// }
// // Reset the phase accumulator for the next note
// phase_accumulator = 0;
// }
// STATE_0 == 0;
// }
// }
// Core 0 entry point
int main() {
// Initialize stdio/uart (printf won't work unless you do this!)
stdio_init_all();
// Initialize SPI channel (channel, baud rate set to 20MHz)
spi_init(SPI_PORT, 20000000) ;
// Format (channel, data bits per transfer, polarity, phase, order)
spi_set_format(SPI_PORT, 16, 0, 0, 0);
// Map SPI signals to GPIO ports
gpio_set_function(PIN_MISO, GPIO_FUNC_SPI);
gpio_set_function(PIN_SCK, GPIO_FUNC_SPI);
gpio_set_function(PIN_MOSI, GPIO_FUNC_SPI);
gpio_set_function(PIN_CS, GPIO_FUNC_SPI) ;
gpio_set_function(PWM_2, GPIO_FUNC_PWM);
gpio_set_function(PWM_1, GPIO_FUNC_PWM);
slice_num = pwm_gpio_to_slice_num(PWM_2);
pwm_set_wrap(slice_num, WRAPVAL);
pwm_set_clkdiv(slice_num, CLKDIV);
pwm_set_chan_level(slice_num, PWM_2, 2500);
pwm_set_chan_level(slice_num, PWM_1, 2500);
pwm_set_mask_enabled((1u << slice_num));
// Map LDAC pin to GPIO port, hold it low (could alternatively tie to GND)
gpio_init(LDAC) ;
gpio_set_dir(LDAC, GPIO_OUT) ;
gpio_put(LDAC, 0) ;
// Map LED to GPIO port, make it low
gpio_init(LED) ;
gpio_set_dir(LED, GPIO_OUT) ;
gpio_put(LED, 0) ;
gpio_init(GPIO) ;
gpio_set_dir(GPIO, GPIO_OUT) ;
gpio_put(GPIO, 0) ;
////////////////// KEYPAD INITS ///////////////////////
// Initialize the keypad GPIO's
gpio_init_mask((0x7F << BASE_KEYPAD_PIN)) ;
// Set row-pins to output
gpio_set_dir_out_masked((0xF << BASE_KEYPAD_PIN)) ;
// Set all output pins to low
gpio_put_masked((0xF << BASE_KEYPAD_PIN), (0x0 << BASE_KEYPAD_PIN)) ;
// Turn on pulldown resistors for column pins (on by default)
gpio_pull_down((BASE_KEYPAD_PIN + 4)) ;
gpio_pull_down((BASE_KEYPAD_PIN + 5)) ;
gpio_pull_down((BASE_KEYPAD_PIN + 6)) ;
// set up increments for calculating bow envelope
// attack_inc = divfix(max_amplitude, int2fix15(ATTACK_TIME)) ;
// decay_inc = divfix(max_amplitude, int2fix15(DECAY_TIME)) ;
// Build the sine lookup table
// scaled to produce values between 0 and 4096 (for 12-bit DAC)
int ii;
for (ii = 0; ii < sine_table_size; ii++){
sin_table[ii] = float2fix15(2047*sin((float)ii*6.283/(float)sine_table_size));
}
// Create a repeating timer that calls
// repeating_timer_callback (defaults core 0)
//struct repeating_timer timer_core_0;
// Negative delay so means we will call repeating_timer_callback, and call it
// again 25us (40kHz) later regardless of how long the callback took to execute
//add_repeating_timer_us(-25, repeating_timer_callback_core_0, NULL, &timer_core_0);
// Add core 0 threads
pt_add_thread(protothread_core_0) ;
pt_add_thread(pt_state_0_thread) ;
// Start scheduling core 0 threads
pt_schedule_start ;
}
[a]Summary of what we did and why