Guppy Hunters

ECE 5730 Final Project created by Daria Sansoterra, Elyn Ye, and Yangou Du

For our final project we chose to create an arcade-style game that we have called “Guppy Hunters.” The motivation behind it was to utilize the flocking behavior of boids, which was implemented and discussed during Lab 2, to model the behavior of a school of fish working together to avoid a predator. In this project we implemented hardware components, such as joysticks and push buttons as well as software components such as modifying the existing boids algorithms and creating game states. From this we were able to successfully create three working game modes: arcade - single player, arcade - double player, and revenge of the guppies.

The arcade mode (single & double player) consists of the player “hunting” guppies (boids). Each level the player has 30 seconds to catch the specified number of guppies. If this is accomplished, the user moves onto the next level where the guppies become harder to catch and an array of different environmental obstacles might block the player's path. If the player fails to catch its prey in time, then it's game over. Double player mode features two predators working together to catch the guppies. This leads to many gameplay strategies such as one predator funneling the prey to the other predator.

Revenge of the guppies turns the predator into the prey. The player's goal is now to avoid the swarm for as long as possible. Once the player falls into the visual range of the boids they rush to attack the player. Once three boids attack you, it's game over.

Our goal was to present players with a fun, interactive, and user-friendly experience all while giving respect for predators and prey alike.

Guppy Hunters - Game Demo

High Level Design

Source of Project Idea

Our favorite lab this semester was “The Boids and the Bees” which modeled the decision making behavior of large animal groups by pushing the computing capacities of the RP2040. This boid lab was inspired by the behavior of animal groups in nature as observed by the paper “Effective leadership and decision-making in animal groups on the move” by Couzin, Krause, Franks, and Levin as well as by the behavior of honeybee colony decision making which was observed by Professor Seeley at Cornell. Using the VGA driver we animated “boids” (short for “bird-oid object”) that would follow a flocking algorithm to imitate group behaviors such as alignment, separation, and cohesion.

Due to our attachment with this lab we knew that we wanted our project to feature an extension of this algorithm. When we were looking through past projects we stumbled upon the project “Boid, Predators, Joysticks, and Friends” by Tyler Bisk, Chidera Wokonko, and Quin Burke which we used as inspiration for our project. Specifically, we used their ideas to model our arcade mode (both single and double player) while adding our own twists such as levels and environment changes.

The idea behind the game mode “revenge of the guppies” was based on the thermal behavior of honeybees as documented by Stabentheiner, Kovac, and Schmaranzer. When invaders attack a colony of honeybees the guards first try to handle the situation. If they are unable, they call other honeybees to help. The mass swarm of honeybees will then each individually increase their internal temperature and swarm the foreign insect in an attempt to destroy them using heat. We decided to take this idea and implement a game mode where you are the foreign attacker and the boids are attempting to rid you from their home.

Boid Algorithm Background

“The Boids and the Bees” project animates multiple small rectangles (2x2 pixels) on the screen which represent boids which are programmed to mimic the flocking behavior of animals in nature. Each boid is initialized by a struct that has a field for x position, y position, x velocity and y velocity. In order to create a flock, a fixed length array of boid structs is initiated. The length of which is the amount of boids in our flock.

The algorithm which controls flocking behavior is called the “boid algorithm.” Which states that for every boid three main rules are checked: separation, alignment, and cohesion. The separation rule states that if boids are too close to one another they will spread out to give the other boids space. The alignment rule states that boids will change their speed to mimic surrounding boids. Lastly, the cohesion rule states that boids will steer towards the center of mass of the surrounding boids. Although the boids move in response to others, each boid can only know of the position of boids within a fixed visual range just like animals in nature.

The boid algorithm runs for every single boid in the array one at a time, for reference we will call this reference boid the main boid. In order to check these rules, the boid array is looped over and compares the position and velocity of the main boid to the surrounding boids.

The algorithm accounts for the separation rule using the following logic. For every other boid, the xy-position difference between the main boid and the other boid is computed. If the distance between the two boids is within the protected range (meaning that the other boid is too close to the main boid) then a position vector is calculated pointing the main boid in the opposite direction of the other boid. During each iteration of the loop, the position vector is updated to include the magnitudes of the other close boid neighbors. After all of the boids have been looped through, the main boid's velocity is updated using the accumulated position vector and a scalable avoidance factor. This moves the boid away from the too close neighboring boids.

Next, the algorithm accounts for the alignment rule using the following logic. For every other boid, the algorithm checks to see if the other boid is within the main boid's visual range (meaning the main boid can “see” the other boid). If the other boid is within this visual range, then the other boid's velocity is placed into an accumulator velocity variable and the number of neighboring boids is incremented by 1. During each iteration of the loop, the individual velocities of the neighboring boids are added to the velocity accumulator and the number of neighboring boids is incremented. After all of the other boids have been looped through, the average velocity of the neighboring boids is calculated. This value along with a scalable matching factor are then used to update the main boid's velocity vector so that it matches the surrounding boids.

Finally, the algorithm accounts for the cohesion rule using the following logic. For every other boid, the algorithm checks to see if the other boid is within the main boid's visual range. If the other boid is within this visual range, then the other boid's xy-position is placed into an accumulator position variable and the number of neighboring boids is incremented by 1. During each iteration of the loop, the individual positions of the neighboring boids are added to the position accumulator and the number of neighboring boids is incremented. After all of the other boids have been looped through, the average position of the neighboring boids (the center of mass) is calculated. This value along with a scalable centering factor are then used to update the main boid's velocity vector so that the main boid gently steers itself towards the other boids in its visible range.

The boid algorithm ties these three sets of logic together and during each iteration over another boid it handles all three sets of rules. The cycle repeats with the next boid in the array until all boids are properly updated. To prevent the algorithm from infinitely increasing boid velocity, the max and min speeds are also bound by certain values.

Similar logic is used to keep the boids within the drawn bounds of the screen. If a boid crosses a boundary, its velocity will be influenced by a turn factor in the direction back towards the boundary. Successful implementation 
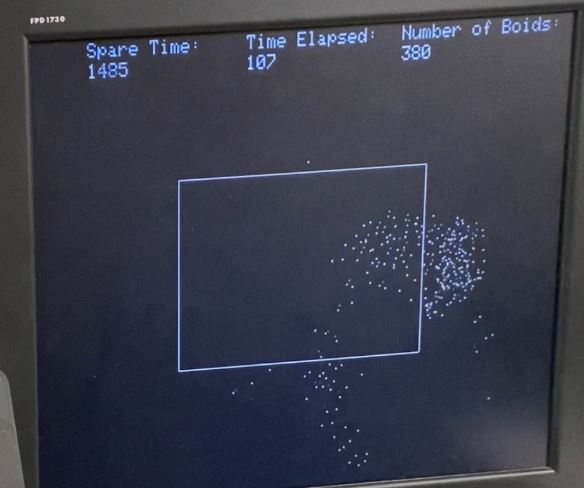
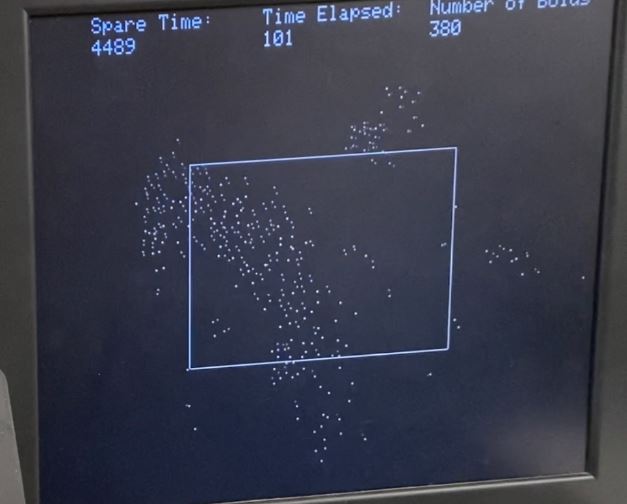
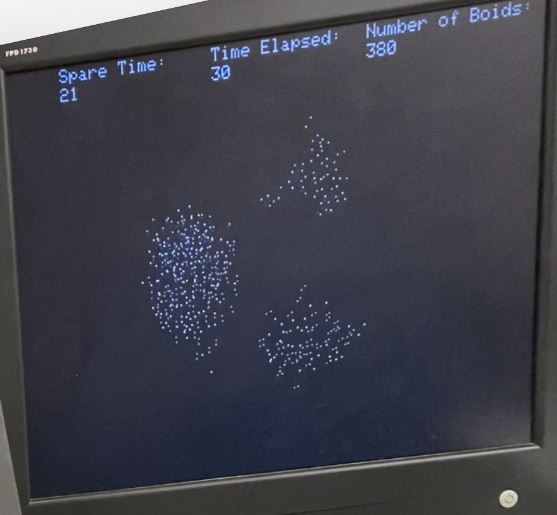
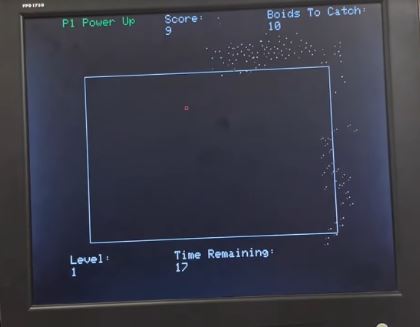
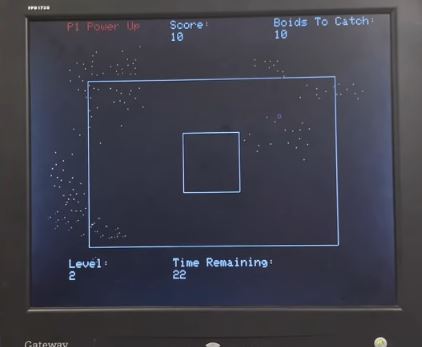
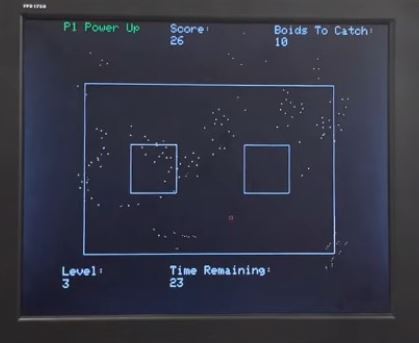
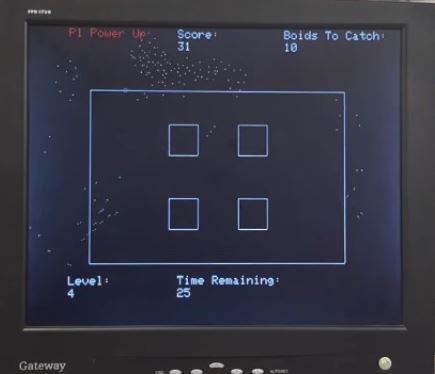
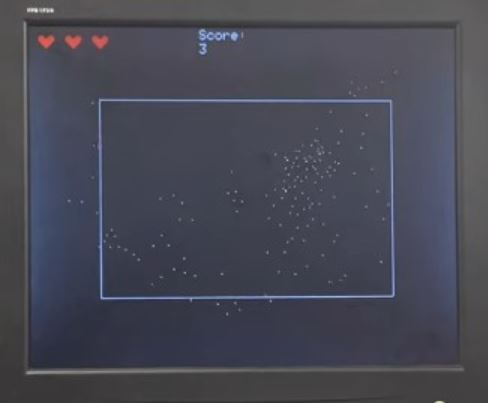
of boid flocking behavior of boids is shown below.

Flocking Behavior

Game Structure

Finite State Machine for Game State

The game itself is controlled by 8 separate states and the logic flow is shown above. The first state (game state = 0) is the title screen shown below. It features, as expected, the title of our game “guppy hunters” as well as a colorful array of fish looking at a predator lurking in the dark. It prompts the player to press a button to start the game.

Once a button is pressed the game will move the player to a different screen known as the “Menu” (game state = 1) where the player is given 3 options: arcade mode - single player, arcade mode - double player, and revenge of the guppies. Using the joystick and the button the player can select which game mode they want to play.

If Arcade Mode - Single Player or Arcade Mode - Double Player is selected then the player is taken to the arcade mode rules screen (game state = 2) which displays the rules of the gamemode: “Every level you have 30 seconds to catch the specified number of guppies. If you accomplish this you will proceed to the next level. If not, it’s game over. Pressing the player’s respective button results in a short speed boost to help catch your prey.” The player will remain on this screen until a button is pressed indicating that the rules have been read and understood.

Pressing the button then takes the player to a “Level 1” screen (game state = 3) which disappears after 1 second and directly moves the player into playing the arcade mode (game state = 4). If the player successfully eats the number of specified guppies they immediately advance to the next level moving back to game state = 3 where “Level 2” is displayed. After 1 seconds the player is taken back to game state = 4 placed in a new environment with boids that are more difficult to catch. This back and forth between the states continues for as long as the player can successfully clear each level. This gradually increases the level display number (game state = 3) as well as the difficulty of the game (game state = 4).

Four Distinct Level Environments

Once the player fails to eat the specified number of guppies in the allotted time they are taken to the game over state (game state = 5) which presents them with their final score (equal to the total number of boids eaten) and the words “Try Again?” If the player clicks the button they will be taken back to the title screen (game state = 1) to select whichever game mode they desire.

The only difference between player 1 and player 2 arcade mode is that double player mode is a cooperative game where more boids per level are required to advance to the next stage. Otherwise they function in the same way.

If Revenge of the Guppies is selected then the player is taken to the revenge of the guppies rules screen (game state = 6) which displays the rules of the ominous rules of the gamemode: “RUN!” The player will remain on this screen until a button is pressed indicating that the rules have been read and understood.

After pressing the button, the revenge of the guppies begins (game state = 7) and the time the player has survived is recorded in seconds. Once the player loses all 3 of their lives, they are taken to the game over screen (game state = 5) which displays their final score (equal to the total number of seconds survived) and the words “Try Again?” If the player clicks the button they will be taken back to the title screen (game state = 1) to select whichever game mode they desire.


Program Design

Predator

We implemented the predators of the game by drawing the outline of a colored 6x6 pixel box. Similar to the boids a predator is defined by its x position, y position, x velocity, and y velocity. Predators always spawn at the top left corner of the bounding box. Player 2's predator is blue while player 1's predator is red.

The predator's velocity and position is updated based on the GPIO inputs from the joysticks allowing the player to control the predator. For example, if the joystick is in the down position then its y-velocity is incremented based on a speed constant. One issue we ran into was that the diagonal speed was much faster than the vertical and horizontal speed due to this speed constant we implemented. We resolved this by dividing the regular speed by root two when the predator is updating both its x and y positions at the same time. This is a good approximation that makes our code run more efficiently while preventing an unwanted diagonal speed boost.

The predator is limited by the same game boundaries as the boids, however the predator cannot go past the drawn boundaries. We left this as a feature to imitate hiding spots for the prey where the predators could not get them. This predator limitation is extended to any boxes that appear within the outer boundary during environmental level changes in arcade mode.

Arcade Mode - Speed Power Up

A feature we added for predators was a speed power up. When the respective player's push button on the breadboard is pressed (Player 1 or Player 2 button), the predator's speed will increase temporarily for two seconds. The predator's color will change during this time to indicate that the power up is currently in use. Player 1's predator will change from red to magenta while player 2's predator will change from blue to cyan.

The power up experiences a ten second cooldown before it can be used again. During this time the power up indicator at the top left corner of the screen will be red, signifying that the powerup cannot be used yet. Once it is ready again the power up indicator will switch back to the color green. Repeatedly pressing the button during the cooldown will have no effect on the cooldown timer nor will it provide any additional speed boost.

Boids Algorithm

Using the same boid algorithm already implemented in the earlier lab, we made changes to add features to our game.

We added an “alive” condition to the boid struct to indicate whether the boid has been eaten by the predator or not. At any point when a boid comes in contact with the predator, the boid will be marked as dead. Dead boids are no longer drawn on the screen. This also allows us to count the number of dead boids which is used to determine when level ups occur as well as keep track of the players score in arcade mode.

Boids in Arcade Mode

The boids are given an additional avoidance factor with respect to the predator’s position. This makes the boids collectively “run away” from the predator when the predator enters their visual range, modeling the behavior of a school of fish turning or separating when a larger animal swims past. This adds a greater degree of difficulty to the game and allows us to incrementally increase the avoid factor to make the game harder in later levels.

Boids in Revenge Mode

The “Revenge of the Guppies” mode is the opposite of our main mode. In this mode, the boids will actively target the player instead. We implemented this by making the avoid predator factor positive instead of negative. This makes the boids increase their velocity towards the predator when the predator is in their visual range. It creates a “swarm” like behavior, perhaps mimicking the behavior of a swarm of bees attacking an enemy. Although it's hard to imagine guppies displaying this kind of behavior, we thought it would be fun to create a mode where the tables turn on the player.

Arcade Mode - Game Levels

We implemented a level state that increments when a certain amount of boids are killed. Each level is separated by a pause displaying the level number. With increasing levels, the boids' avoid factor towards the predator will slightly increase making the boids harder to catch. We also implemented a timer limiting the time the player to only 30 seconds to beat each level. If a certain number of boids are not caught in the allotted 30 seconds per level, the game will end and the player's score will be displayed based on the number of total boids caught. Once the level is beaten, the player will immediately advance to the next stage.

We decided to differentiate between the levels by adding different obstacles. We used the draw function to create an array of different boxes that can be drawn on different levels. As for the boids, we used the same turn factor algorithm to influence the boids to turn away from the inside of the box when they cross the box boundary similar to how the boids avoid the edges of the screen. This allows them to enter the box briefly for a moment of safety while also preventing them from getting stuck or staying in the box.

Other Elements of the Different Game Modes

We created a title screen with some fish graphics to go with the theme of “Guppy Hunters”. The following screen allows the player to select different modes. The players can use the joystick to select different modes. Wrap around is implemented for maximal user experience.

Arcade Mode - Double Player

On top of the classic single mode which has already been described, we added a second joystick and predator allowing for co-op mode. The two player mode features the same gameplay as single player mode except double the amount of boids are needed to pass each level. This involved configuring another joystick and push button for player 2’s speed power up. Player 2 receives their own power up indicator below player 1’s indicator. This can lead to some interesting strategies for “herding” the guppies.

Revenge of the Guppies

The “Revenge of the Guppies” mode is the opposite of our main mode. In this mode, the boids will actively target the player instead. We implemented this by making the avoid predator factor positive instead of negative. This makes the boids increase their velocity towards the predator when the predator is in their visual range. It creates a “swarm” like behavior, perhaps mimicking the behavior of a swarm of bees attacking an enemy. Although it's hard to imagine guppies displaying this kind of behavior, we thought it would be fun to create a mode where the tables turn on the player.


Hardware Design

Hardware Materials

  • Raspberry Pi
  • Jumper Wires
  • Breadboard
  • 3 x 330 Ω Resistors
  • 2 x 5 pin, 8 way Joysticks
  • 2 x Push Buttons
  • VGA Monitor and Cable
  • Joysticks

    A Joystick has five pins. Four pins are for the four cardinal directions and the fifth is a ground pin. The order of the pins are down, up, lift, right, and ground. The joystick is just four switches which connect to ground when the corresponding direction is pressed. For example, when the joystick is pushed to say the down position the switch closes the connection from the down pin to the ground pin.

    We then connected the four direction pins to four different GPIO ports and used their internal pull up resistors to track when the corresponding directional switch had been flicked. The ground pin is connected to the ground pin of the pico. Therefore, the reading turns to 0 when the direction switch is activated.

    For the player one joystick, the 4 pins were connected to GPIO 10 for down, GPIO 11 for up, GPIO 12 for left, and GPIO 13 for right. For the player two joystick, the 4 pins were connected to GPIO 6 for down, GPIO 7 for up, GPIO 8 for left, and GPIO 9 for right. Both joysticks are connected to different GNDs on the Pico.

    Joystick Circuit
    Challenges

    One major problem we ran into was that the initial wiring setup we came up with was unable to track the joystick inputs due to a node which was shorted to ground. This resulted in the input of all 4 GPIO pins always being 0 when we were initially testing the device. Once we recognized the short was created due to the external resistor setup we switched to internal resistors. After making this switch we noticed that only one direction worked properly and that was the “down” direction. Using the oscilloscope, we realized that we had misidentified the ground joystick pin. After swapping the pins the serial monitor displayed the expected and wanted behavior.

    Another issue we ran into was with some of our wire connections when we were setting up the second joystick. Eventually we discovered that for the two joysticks you cannot connect them to the same ground pin or else they interfere with each other. This issue caused our two predators to get stuck in place if they moved in the same direction.

    Push Buttons

    The buttons work similar to the joystick. The 2 buttons each have 2 connections. One side is connected to a GPIO pin that is pulled up, and the other side is connected to ground. When the button is pressed the reading is pulled down to 0 and when it is not pressed it is 1.

    For player 1's button, one side is connected to GPIO pin 15. For player 2's button, one side is connected to GPIO pin 14. Both buttons are then connected to the Pico's GND.

    Challenges

    We found that our code runs much faster than a typical human can press and release a button. This resulted in a transition through multiple states (ie title, menu, rules) with a single button press. To prevent this there are small millisecond time delays between button presses which allow the user to lift their finger off the button.

    Push Button Circuit

    Video Graphics Array (VGA) Setup

    The VGA cable connects to a screen that displays a visual output. It has 6 inputs: GND, VGA_blue, VGA_green, VGA_red, VSYNC, and HSYNC. GND is connected to the Pico’s GND, VGA_blue is connected to GPIO pin 20 with a 330 Ohm resistor, VGA_green is connected to GPIO pin 19 with a 330 Ohm resistor, VGA_red is connected to GPIO pin 18 with a 330 Ohm resistor, VSYNC is connected to GPIO pin 17, and HSYNC is connected to GPIO pin 16.

    VGA Circuit
    Challenges

    During one of the later weeks working on our project, we were suddenly unable to get the colors green, yellow, or blue to appear on our VGA screen. We were confused since the color white was appearing and therefore all 3 VGA colors should have been connected properly since you need blue, green, and red to make white. We decided to completely redo the VGA circuit at a different location on the breadboard and this fixed the problem. We believe it was due to a short between the resistors or some kind of floating node created by the breadboard.

    VGA Circuit

    Full Circuit

    Full Circuit Diagram
    Final Hardware Setup

    Results

    Testing Hardware

    The joysticks we bought off of amazon unfortunately did not come with any manual or instructions. Therefore we had to figure out which direction each joystick pin represented. We hooked up each pin port to the scope to measure the response. This allowed us to determine the directions. To ensure our joysticks were working as intended, we wrote some basic code to test our wiring which displayed “U”, “D”, “L”, and “R” on the serial monitor when the joystick was pushed in each direction. We used this along with the scope to debug any issues with the joystick.

    We knew that the VGA worked when we could see all of the available colors on the screen (red, blue, cyan, green, yellow, magenta, white, and black). And we knew the buttons were working as intended by checking to see if our title and menu screens successfully changed after a button press.

    Testing Software

    We ensured that our game design was working as intended by changing/adding small amounts of code at a time. We started with lab 2 boid code we had previously written. We cleaned up the code, wrote additional comments, and then tested it to ensure it was working as originally designed. Once that was done, we added code for one playable predator. Then added border constraints and that the predator could eat other boids. Then added scoring systems and so on and so forth until we built up to our finished product. By adding small changes to our code we could easily determine faults in our logic and correct them quickly. Throughout this whole process we used the VGA to debug any and all errors with our code as it was very apparent when something went wrong with our game.

    To ensure we were not dropping frames we originally kept an indicator on the VGA screen for how close we were to 30fps. This allowed us to quickly determine if our code was efficient enough for an enjoyable gaming experience.

    Ensuring the Game was Player-Friendly

    We tested the game frequently to ensure it was not only playable but enjoyable. This allowed us to add the necessary features to make it more user friendly. For example on the swarm mode, it quickly became apparent that it was impossible to survive more than 2 seconds. In response to that we added an initial three second grace period, where the boids are repelled by the player rather than attracted. This prevented players from dying instantly after spawning. We also added three lives and an initial starting bias where the boids spawn away from the player. This made the Revenge of the Boids far more enjoyable for users as games where the player has no chance are usually frowned upon.

    In single player and co-op mode, we played the game to make it a reasonable difficulty for the average person to complete at least a few levels. This was done by adjusting the predator and boid speeds, the different avoid factors, the number of boids needed to progress to the next level, and the time given per level. Through trial and error we were able to create a more balanced and playable game.

    Finally and most importantly, we had a few other people in the lab try out our game and give feedback. This was incredibly beneficial for ensuring that the difficulty scaling was reasonable and it also gave us ideas for how to improve our game. For example, one person suggested that we have a visual cue for when the speed boost was in effect which we agreed was an excellent idea. This person is to thank for the predator's color change (player one: red to magenta & player two: blue to cyan) when the speed boost is active for 2 seconds.


    Conclusions

    In the end, we were successfully able to come up with a way to transform the boid algorithm into a simple yet entertaining arcade game.

    Originally we proposed a sea-themed game due to the boids resembling a school of fish. We wanted to add ocean themed elements such as bubbles as power ups and cool graphics. However, we found that implementing such graphics is far more difficult than anticipated. Adding the basic fish sprite on the title screen took hours of work and the ocean themed ideas we had initially would have been even more time consuming. In the end, we decided to prioritize the actual gameplay elements itself. Next time, we think we would have separated out the workload differently. We had high hopes for better graphics elements so if we ever were to make a game like this again we would put someone in charge of graphic design alone.

    If we had more time, we would have designed more interesting levels. We came up with many alternative level designs such as having a very small amount of available boids for the predator to consume and a more diverse array of level environments. We would also have liked to add more hardware components such as an audio jack to add sound effects or actual arcade push buttons.

    The fun thing about video games is that you are always able to make them better. Perhaps in the future we will come back to this project and implement our various ideas left on the drawing board. Despite this all three of us are proud of what we have created! Thank you Professor Adams for a fun class!


    Appendix A

    "The group approves this report for inclusion on the course website."

    "The group approves the video for inclusion on the course youtube channel."


    Appendix B

    References

    Couzin, Iain D., et al. "Effective leadership and decision-making in animal groups on the move." Nature 433.7025 (2005): 513-516.

    Seeley, Thomas D., P. Kirk Visscher, and Kevin M. Passino. "Group Decision Making in Honey Bee Swarms: When 10,000 bees go house hunting, how do they cooperatively choose their new nesting site." American scientist 94.3 (2006): 220-229.

    Stabentheiner, A., Kovac, H., & Schmaranzer, S. (2007). "Thermal behaviour of honeybees during aggressive interactions." Ethology, 113(10), 995-1006.

    Lab 2 Code & Boid Background

    V. Hunter Adams - https://vanhunteradams.com/Pico/Animal_Movement/Animal_Movement.html